Welcome to our forum. A Message To Our New and Prospective Members . Check out our Forum Rules. Lets keep this forum an enjoyable place to visit.
Currently working on errors from the latest (SimplePress) forum update. Many issues have been resoled and others are being worked on. Thank you for your patience.
 Topic RSS


 (0 votes)
 Regulars
 Offline


A couple of months ago, I picked up a cute, old-ish and fairly decrepit violin... lady size... on Craigslist. To be kind, you might call it "naive" craftsmanship.
All manner of things need fixing... the fingerboard projection was way too high, the fingerboard itself was made of a soft wood with a thin ebony veneer, the nut is a mess, the Aubert bridge was a fake, cut ultra high and thick, and the saddle is ever so slightly caved in. Oh yes, and then there's the little crack at the top of the treble side f-hole.
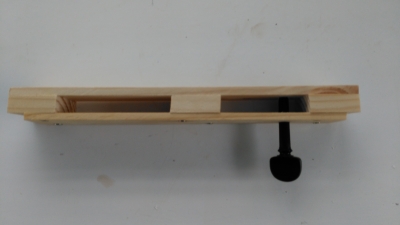
OK, relax everyone. That list is being handled professionally by Felix at Fiddlershop. BUT I did do a DIY (grammatically fishy as phrases go) by installing Knilling Perfection Planetary pegs myself (grammatically redundant.)

Here's a pic with three down and one to go:

There a terrific "how to" link on the Fiddlershop website here:


Good stuff @bocaholly !
I did something similar on a 3/4 fiddle I got from ebay (I had intended to completely disassemble it - but other than the damaged peg-holes and pegs - which looked like they had been shaped with a chainsaw - it actually sounded reasonably good for what it was)
I didn't fit planetary pegs, just new oversize ebony ones - but - prior to reaming the box and tapering the pegs - I made myself a sort of sacrificial pegbox - just to practice on!
Oh - another handy tip - to protect the reamer tool edges when kicking around the toolbox, I found a perfect answer - the body of an exhausted felt-tipped marker-pen !
Congrats on the upgrade ! It's a lot of fun for sure - especially when it all goes well!
@Fiddlerman - DIY badge for Holly !
I seriously recommend not copying my mistakes. D'oh -
Please make your own, different mistakes, and help us all learn :-)
Regulars
 Offline
Regulars
 Offline


@BillyG (BillyG) Love the sacrificial pegbox idea. Looks like the beginning of a cigar box instrument 🙂 My $13 reamer came with a sheath.
Luthiers use reamers that can cost 10 times that but this cheapo was good enough to do the peg holes for a one-off job on mechanical pegs. Not sure how this guy would work on friction pegs.
@steveduf I don't see myself doing this too often but genuinely envy the skills and the use you and Mack put yours towards. After Fiddlershop installed a first set of Knillings on my Sima Traian, I was hooked. It makes the violin soooooo ridiculously easy to tune. Glad I gave it a try and even happier that I didn't make any major boo boos.
Note to anyone else with zilch experience who's going to do this. Look at the video ALL THE WAY THROUGH. I looked at it in full before deciding to go for the fix but then only watched the first couple of minutes of the G-string installation when I actually got started a week later. (The demonstrator does it in the order: G, E and then A & D together to keep the bridge and sound post in place.) I started with the E-string, forgot to wedge up the A string for reamer clearance, and promptly damaged it. New A-string on order, sigh.
Honorary advisor
Regulars
 Offline
Regulars
 Offline


Regulars
 Offline


Regulars
 Offline

Regulars
 Offline

Regulars
 Offline


Thanks, @mookje, there is some really beautiful inlay work on violins out there. This one qualifies as cute, at best, when you take a closer look. It's pretty rudimentary.
I, like most folks, like to have the backstory of their violin so here's what I've been able to figure out so far: The old man I bought it from said he'd brought it (and his father's more valuable Italian violin) with him when he fled Hungary, alone, when he was 15. I put that at about the time of the Hungarian uprising in 1956.
From what I've gleaned elsewhere on the web, this is probably a "Dutzenarbeit" violin from the first quarter of the 1900... Mittenwald, Vogtland (Markneukirchen) and not originally made in Hungary. After WWII, at least on the Czech side of the border, I don't think cutsie inlays were an item. If it's from around Mittenwald, I imagine farmers in hunkering down in the winter months pumping out these student violins to fill their time. Since the size of the neck (short and slim) doesn't match the 4/4 size body, I embellish by imagining that this particular violin was put together just before the farmers had to get back to their fields. They were in a hurry, took what they had lying around, and glued them together. Can't come up with another reason for the mismatch (which works for me, ergonomically except for the ultra high projection which Fiddlershop is correcting.)
There are some online accounts of how the farmers piled up horse drawn carts with white violins when the roads cleared in the spring and hauled them into town (Mittenwald in the story I read) to be varnished and inlayed by students (teenagers, not luthier apprentices.) That would account for the cutsie mother of pearl deco.
That's a lot of "ifs" in one story... other hypotheses welcomed 


Regulars
 Offline


Sounds like to me, bocaholly has been bitten with the violin tinkering bug, next thing we know she will have a Stewmac violin kit and will be working on re graduating the plates, assembling the violin and then creating her on varnish recipe.
Grats on the DIY 
Mark
Master the Frog and you have mastered the bow.
Albert Sammons
Regulars
 Offline
bocaholly said
@steveduf I don't see myself doing this too often but genuinely envy the skills and the use you and Mack put yours towards. After Fiddlershop installed a first set of Knillings on my Sima Traian, I was hooked. It makes the violin soooooo ridiculously easy to tune. Glad I gave it a try and even happier that I didn't make any major boo boos.
Note to anyone else with zilch experience who's going to do this. Look at the video ALL THE WAY THROUGH. I looked at it in full before deciding to go for the fix but then only watched the first couple of minutes of the G-string installation when I actually got started a week later. (The demonstrator does it in the order: G, E and then A & D together to keep the bridge and sound post in place.) I started with the E-string, forgot to wedge up the A string for reamer clearance, and promptly damaged it. New A-string on order, sigh.
Thanks for the kind words
Mack and I are a work in progress, we are getting better at making them look good but really are just starting on how to make them sound good.
Honorary advisor
Regulars
 Offline
@bocaholly seriously, I build daily and have been for decades, I still check my fingers when I put down a saw or if I'm welding, look to see if I have caught myself on fire.
I would have to tear up a few faux peg boxes before i put a reamer to a real one and even then, I would be more likely to send it into a shop to have it done. I take my hat off to you.
Regulars
 Offline


Honorary advisor
Regulars
 Offline
@bocaholly Today I finished up 12 volt electrical wiring, Fixed 20 chairs for the rich people at the farms, (a golfer's club), cooked dinner for the parents, shrimp kabobs. You buy the shrimp and I will cook it. About to go work on the last of the cabinets and finish out the bathroom. Should be done with interior, minus the plumbing before the weekend. Sans plumbing due to a lack of funds but when I can get the stuff that will take all of 4 hours to do. Then paint the exterior (about 4 hours) and viola, I will be completely done,,,, until I come up with some other ignant idea to add something I don't really need. Probably a small shed onto the back, like a big trunk or something.
I been sleeping in it already. Holds heat well down below freezing. The Chicken Hut is almost complete. I will be so glad too, I don't like projects that go on for this long unless I'm getting paid. May have to actually do a video when I'm done and put it on the YouTube.
Since you are luthier now, you can start building violins and I'll learn to finish them out. May not give Pierre a run for his money but we will give him something to laugh at. booyah.


 Log In
 Register


