Welcome to our forum. A Message To Our New and Prospective Members . Check out our Forum Rules. Lets keep this forum an enjoyable place to visit.
Currently working on errors from the latest (SimplePress) forum update. Many issues have been resoled and others are being worked on. Thank you for your patience.
 Topic RSS


 (0 votes)
 Regulars
 Offline


exactly FM
Well, my hide glue finally arrived. Its only 10 days late and its not even from China.. well, at least the place I ordered wasn't in China, more then likely their distributor was.
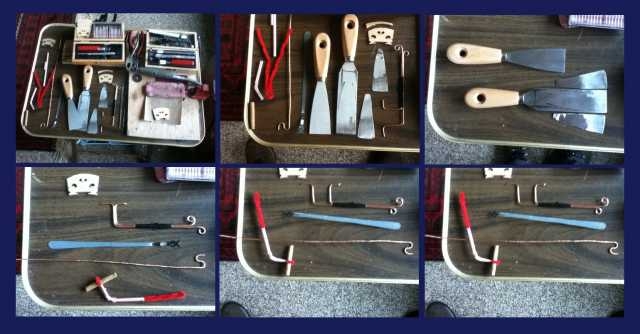
So, I have my glue pot, hide glue crystals, water, a thermometer, a violin, a much needed experienced Luthier (but i'll have to do for now  ), clamps, and a syringe. let see now. what else am I missing.... Spatulas!. To separate the seam and clean the residual glue. Fortunately, I have a handy dandy grinder in my garage and at least half a dozen spring steel putty knives. Ok, I'll get the knives cut down to spatula size and thickness and post pics those this afternoon. Guests/Company will be here this evening, so more then likely I'll start the glue stage tomorrow.
If I am unable to get a clean crisp edge with the spatulas, I'll have to separate the body from the ribs. I think if comes to that point, I'll sell my house contact the Guild of American Luthiers and seek the solitude life of an apprentice Luthier. One high up in the snowy and secluded mountains somewhere discrete and secreted.
I decided to complete the bridge instead, due to the time. I shaped the feet and cut the height (I know I may end up not using this one, but I need a blank to start with as the originals are both way too short) I think this one will be tall enough so I can still take some off the top, keep my tapir and the back side at roughly 90degrees to the surface. I rubbed with 120, 200, then 400 grit sandpaper n the belly to shape the feet of the bridge. It looks pretty good. I think this sits better then the originals. I'll get pics of that uploaded when I can too.
"I find your lack of Fiddle, disturbing" - Darth Vader
Regulars
 Offline


My download cable for my itouch doesn't seem to be connecting. I'll pick up a cable tomorrow and download a bunch of pics.
I was busy today. I was able to get the glue prepared and applied. The body is now finished...at least until I take the clamps off tomorrow and see what a mess I made..lol...
I finished the mother of pearl inlay in the tail piece (really I finished this last night). I cut both the end nut and the saddle to fit the body. The saddle is slightly out of symmetry, but it still looks good. most people probably wont be able to tell. I can, I see my template. It also will be under the tail piece. I had to cut it twice as I took too much off the first one with my dremmel.
The nut drove me nuts. Hard to shape the little thing and keep the beveled edge with a rounded top. I left room to take more off if need be. I have not slotted the nut or Bridge yet. My triangle key hole file has a notch in it. So, I'll pick one of those up tomorrow also.
I was looking at the neck and scroll. I used a syringe and shot hot glue into the seem and set it wit rubber bands and then put the whole violin in an old "beginner" violin case I had from my garage. Its nice for to hold it all together while the glue set.
Now I see and understand animal glue. If you make a mistake with a "tight bond" glue, you just made a nice expensive piece of fire wood. With animal hide glue, you break its holding strength (192g) and it pops apart with no noticeable damage to the wood. Its virtually Leo proof. 

@kevin or Pierre or probably even Daniel (or anyone)
When I cut and shaped the saddle and nut, the Ebony turned a slight brown color. I polished it with 600 grit then burnished it. It still is not completely black. Does anyone recommend dying it or staining it black, or should I keep it as it. The images tomorrow will show what I mean, but you may already know what I speak of.
"I find your lack of Fiddle, disturbing" - Darth Vader
@ Pierre: The Ebony on my FM Concert Master isn't dyed and the grain is very tight. When my Luthier planed and scraped the fingerboard to scoop it, I watched him and he didn't have to put any dye or coloring on it at all, it remained jet black. Even when I clean the string's and fingerboard, the only black that come's off on the cloth is from the string's so I gotta believe it is a good quality Ebony.
Members
 Offline


From what I understand, it depends on the variety of ebony. Only a small percentage of certain varieties is actually completely pitch black. Most of what is used for musical instruments is dark, but not always black. It may even have some lighter coloured "streaks" to it. But people think black is "better quality", so much of it gets dyed.
That's for appearance, really, since even the "less than completely black" pieces are still very hard durable wood that makes a good fingerboard.
I have 2 fingerboards that are ebony and unfinished/undyed. They are both slightly different shades of very dark brown with a slight reddish cast. To a casual glance, most people would call them black. Grain is clearly visible if you look close, they are nice wood.
The fingerboard on my Hoffmann is ebony and black. And dyed and oiled. I asked about that and they told me before I bought it. I don't have a problem with it, at all.
The oil used for fingerboards, assuming they are like guitar fretboards is *not* furniture polish. It is usually tung or teak oil. Oils that dry hard and are there to help seal and protect the wood. I can only speak from experience with guitar fretboards, but with those, un-oiled fingerboards get ruts sooner and don't clean up as well with a wipe from a cloth.
Fact of life, even the finest and best and prettiest ebony will not last forever. Your fingers and strings eventually wear into it, and it needs scraped or planed to make it "perfect" again at least once every several years, if you play a fair bit. Maybe violin strings are a little easier on it, but it will still need it eventually.
Some people say (and I would agree) that getting it oiled once very year or two helps to minimize the wear. But some people don't feel it does help, and some really don't like the feel and prefer an "open grain" feel under their fingers.
Some real ebony is very black, and some isn't. It isn't really a reliable gauge of quality, from what I have ever seen. Plenty of "near black" or even streaky looking ebony can last for decades before scraping or planing take away enough wood eventually that it needs replaced. But the general public tends to seem to prefer black looking ebony, so dying it is a common enough practice.
Especially on very low priced violins where the fingerboard isn't actually ebony in the first place. LOL
I really don't like fingerboards that are painted to make them look black. Dye, I don't have a problem with. It doesn't change the feel or sound, and if it is a decent grade of alcohol based dye like say "Fiebings", it won't come off on your fingers once it is dry and has been buffed. If your ebony isn't quite black, and you want black, that's the fix I was taught for guitars. The repairman I used to learn tricks from at a local shop used Fiebings black leather dye on fingerboards.
The two "loose" ebony fingerboards I have in my parts box (one is for my "in the white" violin project, the other is a replacement for the graphite epoxy fingerboard on my electric), I will oil, but probably not dye. They are dark enough that most people would call it black at a casual glance, and I feel that dying wood kills some of what is pretty about nice wood. There's the tiny variations in the fibres of the grain when you look close that are what gives it the sense of depth and complexity. Dye it, and you lose most or all of that.
I'm def a believer in oil on ebony (and other fretboard woods) as basic maintenance, though. Applied right, it doesn't make them glossy and they still feel like wood to the touch, but they hold up better and clean up easier, in my opinion. Next time I change the strings on my Hoffmann, I'll most likely oil the fingerboard since it will be about a year I've had it and it will be due for that.
One more note.. if your fingerboard is made of some other wood than ebony, like rosewood, for example? Oiling it is more of a necessity and less optional. Rosewood in particular is prone to cracks and splitting, and oiling it protects it from that. Rosewood can hold up for a lot of years with some maintenance and common sense, so can even maple.
"This young wine may have a lot of tannins now, but in 5 or 10 years it is going to be spectacular, despite the fact that right now it tastes like crude oil. You know this is how it is supposed to taste at this stage of development." ~ Itzhak Perlman
Well, I don't know much about this kinda stuff, but I wouldn't oil a violin fingerboard if it's good wood, it become's a magnet for rosin dust. I have 3 violin's, one being 130 yr old and all three of the fb's are jet black and very tight grained. I clean them on a regular basis and never get black on the cloth and they have never changed color.
Regulars
 Offline


Thanks for all the replies.. and sorry about my delay. it seems my truck accidentally hit a drunk driver while parked in the street parking area a few nights ago. I don't know what came over my truck. All on its own, about 3am, it just decided to jump out in front of an inebriated motor vehicle operator. When the police showed up, he said the truck and my neighbors car hit him and he was going to sue the officer for infringing on his rights. Nice. Good luck with that. One word for him : Sphincter
Ok let me get those images "shrunkified" down and post them. (in about 10 minutes give or take)
I don't know what happened.. I was uploading and the web page expired now the images are in here about 3 times, but don't show... I'm going to use another entry to see if it fixes it
Disregard the images here, they wont delete or even show up in my edit. Go 2 posts down to see the images.
"I find your lack of Fiddle, disturbing" - Darth Vader
Regulars


Thanks for posting all of this. I find it so fascinating.
Opportunity is often missed because it wears suspenders and looks like hard work.
Regulars
 Offline


Ok here we go.
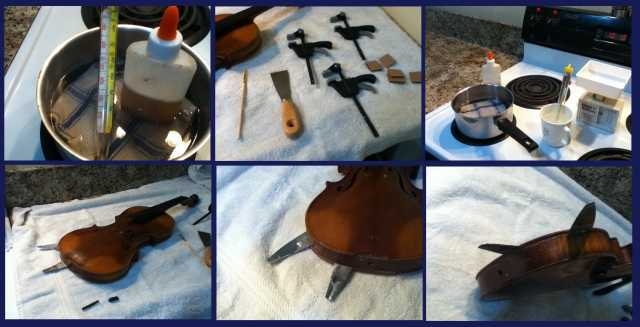
1st Panel : The prep and showing the size of the seam that let loose. The hide glue at 192g str was at about 150degrees with a mix of 25/45 as recommended at this crystalline stage. It was difficult to keep regulated and it does start to gel relatively fast.
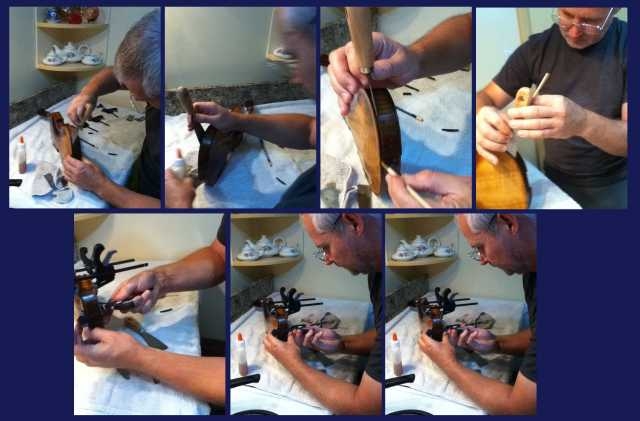
2nd panel : Luthier-wanna-be me. lol. Notice the lack of skill and finesse I truly display in my talents as a instrument craftsman. The clamps are clamps I use for small projects and are backed with a cork I cut so the wood was not damaged.
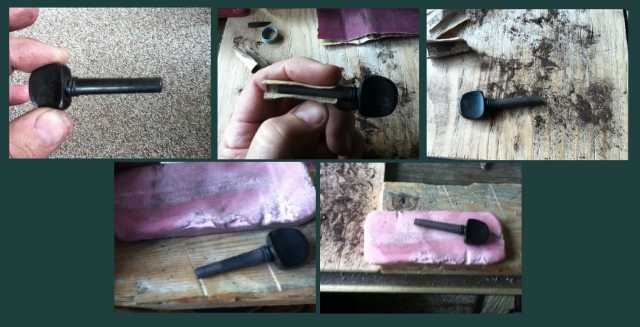
3rd Panel : Cutting the pegs by hand. And fitting them was not too bad. I inserted the peg and twisted to get a mark on the peg from the hole and twist sanded to keep the peg round and slowly worked my way across the pegs 1 at a time, custom fitting them for each hole. At some point I think you see my pencil markings so I didn't mix them up. The large pink erasure is soft rubber. It makes a great burnisher - so to speak. Polishes the wood and cleans any wood dust from micro scratches.
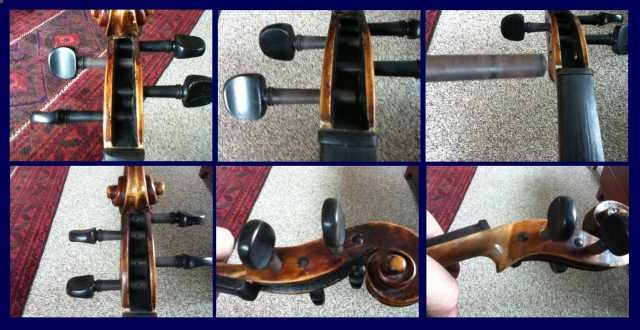
4th Panel : setting the pegs and showing the areas tobe sanded. Also the the final point when pegs were rounded, poilished and finally set to playing length. Holes are drilled and showing. 3/32 drill bit used in a hand drill, then a micro file to smooth out the inside
5th Panel : the tools I fabricated to do the job. The spatulas were paint scrapers, I ground down to a very thin and flexible thickness, then polished the ends. The rest..well that is a story.
I used 12 gage copper wire to make most of the sound post setting tools.
The gismo with the 2 "eyes" was my gage for the inside height. It is celephane tape - sticky side out - wrapped tightly around the 2 formed copper pieces. Then electrical tape to cover it and give me a handle. I set it in the F hole pulled the eyes together until the 2 arms touched the body (top/bottom) then turned it sideways and pulled it back out. this was my sound post height.
The blue thing is a hacksaw blade, ground and formed then I rubberized painted. it to stop unwanted lacerations to my hands. lol
The other "thing" is my holder. It is a straw with a pipe cleaner. the loop went around the sound post and it was firm, flexible, adjustable, and by just pulling the straw off the pipe cleaner, it easily slid off the post once in place. The pipe cleaner let go of the post and came out with no problems.
The copper hook was put in through the F hole and the long end out the end pin hole. I used this to adjust the post from the rear, the straw held it in place and the hack saw tool from the other F hole. I had the sound post standing vertical in less then 5 minutes.
I purchased 5 blank bridges. 2 were garbage (bad grain). I used and destroyed 1 on my first attempt. I am just using a blank right now to play and it sounds pretty good. It is obvious I need to tune the sound post location and probably, once I cut down and thin out the bridge, I think this will play really well.
Oh, I purchased an Elmers glue bottle for all of 59 cents and cleaned it out and used that. it seems specialty bottles were several dollars and not available in my area without e-purchase. I should also note I did boil the water I used to deter contaminants (and let it cool down to 135 degrees before using)
"I find your lack of Fiddle, disturbing" - Darth Vader
Regulars
 Offline


It is all together. I did find a small crack right at the left F hole bottom. I made a patch from a small cut piece of cloth, soaked it in the hide glue and lightly wiped it. Then, using my sound post setter, I set the soaked cloth on the flat of it, inserted it into the f hole and aheared it to the bottom of the crack. Looking into the end pin hole, I was able to flatten it out. Now all you see, is a very slight discoloration from the glue. and the crack is even hard for me to find and I know exactly where it is. No glue dripped or appeared to run. I did wipe it with a small warm watered sponge to clean up after the glue started forming a skin.
I do need to adjust the sound post to tune, but its not too bad. I have steel strings on it right now. I wont change them until I am sure the sound post is where it sounds best. I will try and record something on it tonight or tomorrow and get it loaded up for your listening torture ![]()
- I have not dyed the area on the pegs or nut yet. I did the shoe polish on the saddle and it worked quite nicely. I probably will do the others when I change out the strings when I am satisfied with the sound post.
Again thanks for the input from all and the interest. It makes you have a better understanding of what we are playing on and some of the painstaking efforts it took to get us our toys.
"I find your lack of Fiddle, disturbing" - Darth Vader
Regulars


You sir, are a brave man! I have a Stainer aprox. the same age and I'm nervous bringing it out of the case! LOL It needs work, but I'm just going to save up to have a professional do it! ......I don't trust myself enough. 😉
“Tell me and I forget. Teach me and I remember. Involve me and I learn.” ~Benjamin Franklin


 Log In
 Register


