
Welcome to our forum. A Message To Our New and Prospective Members . Check out our Forum Rules. Lets keep this forum an enjoyable place to visit.
Currently working on errors from the latest (SimplePress) forum update. Many issues have been resoled and others are being worked on. Thank you for your patience.
 Log In
 Register

 Topic RSS
 (0 votes)
Member
 Offline


The joy of hearing that first note – a new violin is born!
Imagine that sinking feeling when you open your smashed violin case to find your much loved French violin shattered, a pitiful sight indeed. A broken section of the lower bout protrudes from its rib and both plates appear to be split. This was my experience some years ago when a blackboard slipped out of my hands and slammed head long into my violin which was on the floor in its wooden case. As this was the violin I often played in school assemblies, news of this mishap spread quickly through the staff and students.
In time, what emerged from this splintery mess was a journey into instrument making which continues to this day. Repairing a smashed violin can be costly so I decided to study violin making first, make one myself and then try to resurrect the violin in question. At that time a colleague of mine was also interested in violin making, so together we began reading and researching the art of violin making. Books we referred to were Heron-Allen’s Violin-Making A Historical and Practical Guide (2005), Alton’s Violin Building and Repairing (1964), and Reid’s You Can Make a Stradivari Violin (1950). We found the latter the most helpful.
We purchased timber from a local timber merchant who had some knowledge of specialist timbers and soon our first violins were commenced. We chose bass wood and Queensland maple as the closest we could find to European timbers for violin making. Incidentally, bass wood was also used by one of Australia’s earlier luthiers. Devereux’s 1869 violin is located in Sydney’s Power House Museum, and has a one piece top made from bass wood. Bass wood was probably readily available in the mid nineteenth century (Coggins and Lea, 2004).
Being my first violin I erred on the side of caution with oversized measurements. The violin tended to be smaller in size because of the difficulties in working within an external mould. However this violin sounded somewhat clearer than other violins I had played. A friend who was a connoisseur of classical music, asked if he could be the very first person to hear the instrument play for the first time. My wife organized a phone link-up, and all listened closely in anticipation for that first celestial sound, much to the delight of family and friends. Later that week I was invited to play my violin for colleagues and students who were equally inquisitive and fascinated with the violin I had made.
I played this instrument ‘in the white’ for some time in an orchestra and avoided varnishing it for fear of what would happen to its tonal quality. With my first instrument completed I then set about repairing the damaged violin. I felt a deep feeling of responsibility because this violin had been my father’s much loved instrument and previously the property of a leading violinist from a well known orchestra. As the back was in worse condition than the top, I reluctantly prized it away from the ribs. This procedure allowed more maneuverability for piecing together the left lower bout, splinter by splinter. After resurrecting the rib and gluing the cracked plates, I was able to reassemble the instrument. Once the sound post was reset, I was pleasantly surprised when the violin performed equally as well, if not better than before. I used this violin to play Beethoven’s 9th and Mozart’s 40th in the WSO. Being a French design with a longer and narrower body it seemed to perform differently to other instruments made using the Stradivari design.
My second violin was based on the Stradivari model found in You Can Make a Stradivari Violin by Joseph Reid (1950). It was made using an external mould and like Douglas Eaton (1999) writing in the Journal for the Australian Association of Musical Instruments Makers, I found the inside mould preferable to the outside mould for mounting blocks and attaching ribs. This particular instrument was a hybrid of Australian and European timbers and took some time to finish. A professional cabinet maker kindly cut out the mould on his band saw and cut the ribs using his precision table saw. I spent some time with a Mr Bradley a AAMIM violin maker from the 1980s, and as I was a novice in the field, he was able to pass on some valuable information and support. He offered to mentor me through the construction of a cello, but sadly I had to decline because of the time restraints associated with postgraduate studies.
While my second violin lay in a state of semi-completion, I was able to show my students the parts of a violin and how it was constructed. As they held the top plate in their hands they were intrigued with the feel of sound waves produced by the voices within the room. Remarkably, a few expressed interest in following up violin making at a later stage in their lives. What would be beneficial to Australian instrument making would be to have some instrument makers visit schools and show interested teachers and students the processes involved in musical instrument making. Presentations of this kind would surely connect with a range of curriculum areas.
Once my second violin was finished in 2005 I played the school song and the national anthem using this violin at a school assembly. The Principal asked the students what they noticed different about the violin I was playing (having previously used another violin). ‘It’s the one Mr Hadfield made,’ they replied. Both parents and students were fascinated and inquisitive about this violin commenting on its beautiful mellow tone.
Many luthiers prefer to use already produced violin fittings such as finger boards, tail pieces and pegs. Australian native mulga and gigi seem to be dense and hard enough for this purpose so I experimented with creating my own fittings. Violins made from Australian timbers have captured the attention of discerning audiences and players over the years. In this vane players have found that the luthier Akerman’s Australian made violins using Tasmanian timbers to have a tonal quality that is more mellow when compared with equivalent European instruments. I take encouragement in ‘the small changes he was making in the tastes of a very conservative culture’ and like him I’m willing ‘to give it a try’ (Akerman, 1996, p. 18). A more recent project has been to construct a violin using Tasmanian Blackwood and NSW Hoop Pine. Its first notes exceeded my expectations. I then tried to improve its sound even further by making some minor adjustments using scrapers and completely ruined it. You live and learn! My future plans involve the construction of Stradivari, Guanari and Maginni violins using Australian as well as European timbers. Here’s hoping!
References
Alton, R. (1964). Violin Building and Repairing. William Reeves, London.
Brown, H. E. (2000). The Violin Maker’s Guide. International Guitar and Import Co. Tulsa, Oklahoma.
Buchanan, G. (1997). The Making of Stringed Instruments A Workshop Guide. B.T. Batsford, London.
Coggins, A. and Michael Lea, M. (2004).‘Making it down under’ in The Strad. July (04) http://www.thestrad.com/haboutus.asp
Eaton, D. (1999) It Works For me. In JAAMIM Journal of the Australian Association of Musical Instrument Makers. 28 (3).
Heron-Allen, E. (2005).Violin-Making A Historical and Practical Guide. Dover Publications, New York.
Ossman, B. (2000). Violin Making A Guide for the Amateur. Fox Chapel Publishing Co. Inc., East Petersburg, P.A.
Reid, J. (1950). You Can Make a Stradivari Violin. Popular Mechanics, New York.
A revised edition of an article written for The Journal of the Australian Association of Musical Instrument Makers (2009)
© Dr Colin Hadfield 2010

Regulars
 Offline


WOW!!!
Can we please see some pictures of your incredible acomplishment(s)!?
As a part time luthier myself I'm fasinated with your story and achiement. Welcome to the family here... Hope you find something of value and may you share your knowledge and play with us in the future.
Welcome![]()
"If you practice with your hands you must practice all day. Practice with your mind and you can accomplish the same amount in minutes." Nathan Milstein
Regulars
Offline
amazing! Thanks for sharing the story.
gary
"Make every note beautiful", Ivan Galamian
“To play a wrong note is INSIGNIFICANT; To play without PASSION is INEXCUSABLE!” , Ludvig Van Beethovan
"It ain't rocket surgery"
Member
Offline

Thanks cdennyb, Ginnyg and gwscheer for your kind comments and welcome. Here are pics of some of my work. I look forward to participating and playing with the FM musicians in future projects. Colin
Pictures:
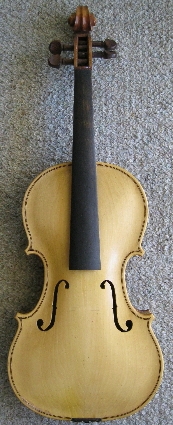
1. Violin No. 1 basswood and QL maple
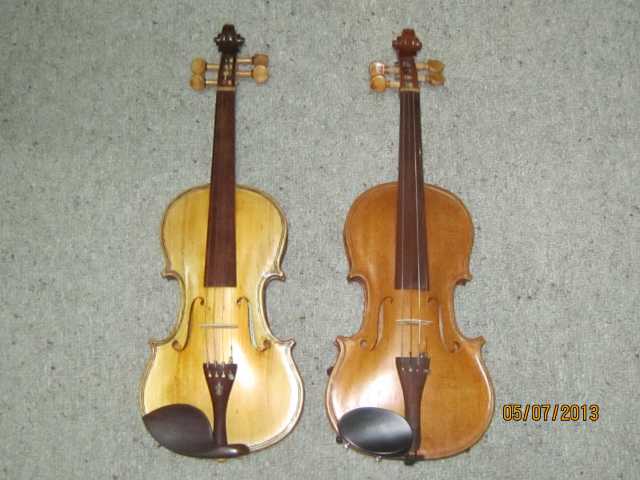
2. Violin No. 3 hoop pine and Tasmanian blackwood Violin No. 2 sitka spruce and QL maple
3. Backs of above violins
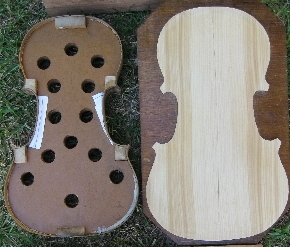
4. Violin No. 3 in progress


I see you changed to the internal mold. I have always used the internal and thought about making an external. What are your thoughts on the internal mold? For this past Christmas my wife purchased the plans and templets for me to build a Guarnari. I have some maple slabs I have been waiting to use and a nice piece of spruce all from local trees cut 2 years ago. I also have what we call iron wood which I plan to use for the fingerboard.
Member
Offline
My first violin was made using an external mould which I found in Alton's book, 'Violin Building and Repairing'. As a result it turned out a little smaller in width and body length as the ribs failed to fit snugly inside the mould. Using the internal mould seemed to be easier for achieving an appropriate 'fit' for the ribs, besides which most luthiers use internal moulds.
Interesting that you mention your templates for a Guarnari. I went to hear an extremely valuable Guarnari violin played in our local area, making sure I had a seat close to the front to get a close up view. I was so impressed with how it sounded I went out and bought the plans for one. So when you make yours I should do the same and we could compare notes. You are fortunate to have such suitable timbers grown locally and milled for the purpose. The iron wood may be similar to our ironbark which also is hard, but quite heavy so for a finger board I would have to reduce its weight with scoops of timber removed from the underside.
Have fun building your Guarnari Kevin,
Colin


