Welcome to our forum. A Message To Our New and Prospective Members . Check out our Forum Rules. Lets keep this forum an enjoyable place to visit.
Currently working on getting badges to show up horizontally. Should hopefully figure that out within a week. Thanks for your patience.

AAA
Avatar
Please consider registering
guest
sp_LogInOut Log Insp_Registration Register
Register | Lost password?
Advanced Search
Forum Scope


Match


Forum Options


Minimum search word length is 3 characters - maximum search word length is 84 characters
sp_Feed Topic RSSsp_TopicIcon
Frets for your violin!
A jig building and fret installing project to follow
Topic Rating: 5 Topic Rating: 5 Topic Rating: 5 Topic Rating: 5 Topic Rating: 5 Topic Rating: 5 (8 votes) 
Avatar
cdennyb
King for a Day, Peasant for many
August 17, 2015 - 12:21 am
Member Since: February 13, 2012
Forum Posts: 1818
sp_UserOfflineSmall Offline


Just an update for the group:

In another thread I had asked about fretting a violin or viola fingerboard and since this is going to turn into a nice project I decided to give it its' own thread so questions could be asked and pictures posted as I go along.

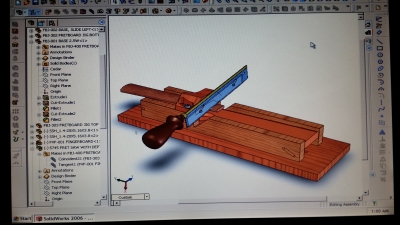
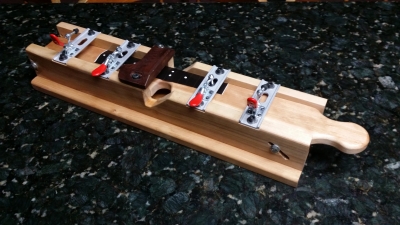
I started out with my Solidworks program software and created what I thought would work out for trying to attack the multiple curves and tapers involved in a fingerboard and cutting precise slots for frets exactly perpendicular to the fingerboard centerline. Not easy to do but with some trial and error I've designed a jig to accomplish that exact task.

20150722_010124.jpgImage Enlarger

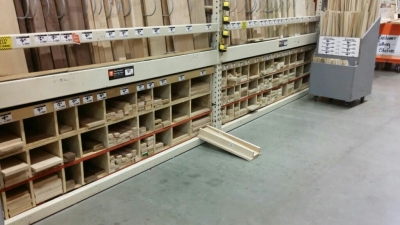
I acquired the necessary hand selected boards, (Yes, I looked at every single board in that rack!) which took the better part of a 1/2 hr and then did all the necessary handi-work to achieve what you see now.

IMG_20150807_140029_8_1.jpgImage Enlarger


I've just finished it with some nice clear urethane and then topped it off with steel wool (0000 size-very fine) for a very smooth non-glare, non-reflective surface which is sooooo smooth.

P8060253.JPGImage Enlarger

P8080012.JPGImage Enlarger

P8080015.JPGImage Enlarger

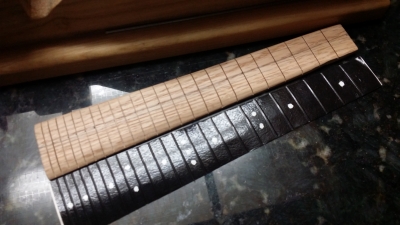
I'm waiting currently for 4 fingerboards to arrive (They're being made for me currently) which will give me two for each size violin I want to work on (a 4 string and a 5 string size) in both ebony & maple wood.

I have the frets and my new back-saw should arrive in the next few days. I have to locate some 2mm dia dots for the fretted fingerboard which get done between slot cutting and fret installation. I'm trying to decide which would be better, "Mother of Pearl" or "Abalone Shell"... hmmmm. decisions decisions.

I'll post more after I get some more parts & pieces.

"If you practice with your hands you must practice all day. Practice with your mind and you can accomplish the same amount in minutes." Nathan Milstein

Avatar
kylesito

Advanced member
August 17, 2015 - 8:35 am
Member Since: April 19, 2014
Forum Posts: 79
sp_UserOfflineSmall Offline

 I think this is a pretty cool project.  Curious what your motivations are?  Is it just something fun or are you doing it for a practical purpose.


I 'fretted' my fiddle with stickers to help me learn the basic positions.  I honestly don't know how I could have done it without the aid.

Avatar
cdennyb
King for a Day, Peasant for many
August 17, 2015 - 8:12 pm
Member Since: February 13, 2012
Forum Posts: 1818
sp_UserOfflineSmall Offline


A Viper fretted violin from the Mark Woods collection will cost around $3K...and they will NOT sell me a fretted fingerboard alone. 

The cheapest luthier/guitar fretted instrument repair facility wanted $600 for 1 fretted fingerboard for my 5 string violin... and I had to send them a fingerboard! That's ridiculus.

In reflection & in consideration of that cost factor... and the incredible ease at playing with frets, I decided to have a 'go' at doing my own frets and perhaps it would turn into a profitable endeavor in the future.

I can fret fingerboards and sell them by themselves. The customer can take their violin to a luthier (shop) and have the fingerboards swapped out for about $10-$20 and have a fretted fingerboard instrument. I can do both 4 string and 5 string violins and violas. I haven't tried to fit a cello fingerboard on it but I'm pretty sure it will.


Here is a very good explanation on frets and dot placement on a violin from the man who invented the electric violin.

The dot placement explanation starts at 3:00 into the vid.

"If you practice with your hands you must practice all day. Practice with your mind and you can accomplish the same amount in minutes." Nathan Milstein

Avatar
LindaMc
New Jersey

Member
August 17, 2015 - 9:33 pm
Member Since: May 31, 2015
Forum Posts: 39
sp_UserOfflineSmall Offline

That's a great project! Nice looking jig, too. I'm sure you'll do a wonderful job with it. Will your frets be similar to the Wood violin frets or more like a guitar?

Avatar
cdennyb
King for a Day, Peasant for many
August 19, 2015 - 1:56 am
Member Since: February 13, 2012
Forum Posts: 1818
sp_UserOfflineSmall Offline


I'm not sure exactly in what way they would be like a guitar fret. They have to follow the multicurved surface of the violin fingerboard which is considerable more curved than a guitar. A violin fret will only be about .94mm max high and 1.35mm wide polished to a mirror surface as well and level with respect to the fingerboard curved surface. Guitar frets are made to played "behind" and not necessarily on "top of" whereas a violin can be played in between as well.

The woods violins use a small narrow gauge fret which I will use as well. initially made for banjo and mandolin fretboards. I've enclosed a screen print of the Stew-Mac frets I'll be using.

stew-mac-page.JPGImage Enlarger

The major difference is the 330mm nut to bridge length which must be maintained on MY violin, because my fret distances will be dictated by that strung length. If I make a fretted fingerboard for a different violin, it will only be proper for that instrument and that strung length.

fret-spacing-chart-3.JPGImage Enlarger

I have several acoustic violins with various string lengths between the nut & bridge so each (if I were to make one for them) would be a tiny bit different. Here's a chart for just a 1 mm longer strung length. Not much but it gets to be quite a bit by the 24th fret! (compared to the chart above for a 330mm length.

fret-spacing-chart.JPGImage Enlarger


The dots are the next challenge as they need to be in a specific location for use as a reference in tone and note identification, and there's only so much space between frets so I opted for the smallest (side dots for guitars) pearl dots available, 4mm in dia which I will inlay as noted on the woods violins.

5-string-viper-fretboard.JPGImage Enlarger

"If you practice with your hands you must practice all day. Practice with your mind and you can accomplish the same amount in minutes." Nathan Milstein

Avatar
cdennyb
King for a Day, Peasant for many
August 23, 2015 - 2:23 pm
Member Since: February 13, 2012
Forum Posts: 1818
sp_UserOfflineSmall Offline


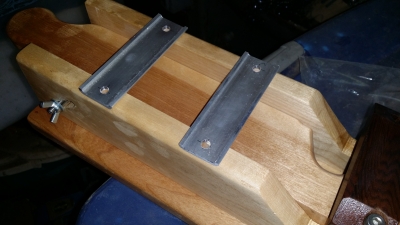
Received the dots for the fretboard/fingerboard, also the clamps so I decided to go ahead and make the aluminum brackets to mount them on and modify the side rails of the jig to receive them. First I had to layout the locations so at least 2 clamps would be holding the fingerboard at all fret cutting locations.


20150822_140024.jpgImage Enlarger

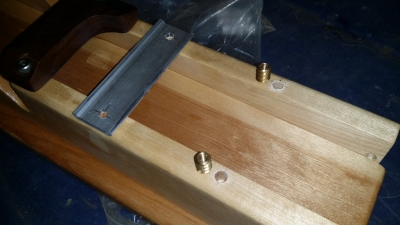
Then I drilled for the threaded inserts. Each insert needs it's own .300" dia hole to thread into without splitting the wood!

20150822_140045.jpgImage Enlarger


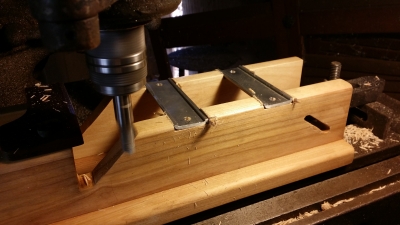
Then we need to mill out the proper width and depth for the bracket strips to inlay into for added strength and cosmetic reasons.

20150822_144741.jpgImage Enlarger


Now we have to drill, tap and slot the brackets and attach them to the freshly milled and inserted side rails. The small screws are 4-40unc threads that hold the clamps in place, the other two bigger ones are 1/4-20unc threaded inserts and screws.

P8220073.JPGImage Enlarger


Then they are sandblasted and sprayed with a clear urethane coating, (I didn't have the stuff to anodize in clear, only flat black so I didn't do that) and istalled with the clamps. All ready to engage the fingerboard 'victims'...

20150822_2108141.jpgImage Enlarger

"If you practice with your hands you must practice all day. Practice with your mind and you can accomplish the same amount in minutes." Nathan Milstein

Avatar
cdennyb
King for a Day, Peasant for many
August 27, 2015 - 3:24 pm
Member Since: February 13, 2012
Forum Posts: 1818
sp_UserOfflineSmall Offline


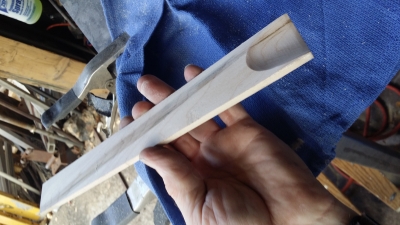
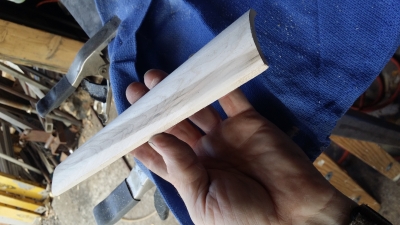
I managed to receive my Fret Saw a few days ago and have sanded down and shaped a piece of scrap maple to kind of simulate a fingerboard although it does NOT have the full 42mm radius at the big end. The taper is correct and this is all I was testing for at this time. I have laid out and cut all the necessary 24 frets that will be used and this saw cuts really clean and precise! I used the fretted fiddle applique to decide the fret locations but will use a pair of dial calipers to lay out the final frets on my upcoming 5 string fingerboard still to arrive.

20150824_194758.jpgImage Enlarger

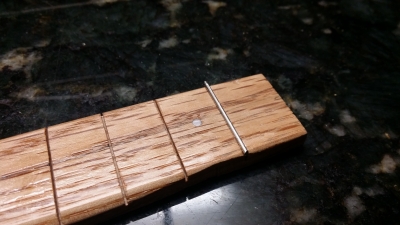
I managed to match the fret locations perfectly and then decided to "burn" a sample fret AND dot to see if my craftsmanship was acceptable... Apparently it is, so now the wait for the 4 fingerboards I have on order commences.

20150824_195109.jpgImage Enlarger

Here's another picture of the finished product of one test fret and one test dot. It is a 2.8mm dia brad point bit used and a pair of tiny tweezers to hold the dot while pressing it into the inlay hole! Wow, need a pair of old person glasses to see these! I think on an ebony board the pearl dot will really rock this thing, but on the lighter maple wood, a black dot or abalone dot would work better for the contrasting color.

20150824_201514.jpgImage Enlarger

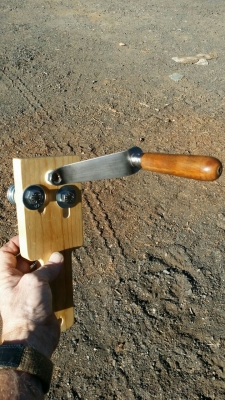
Well, that's all I can do for now, more to come. Oh, I had to make my own fret bender so I could roll the tighter radius of a violin, as the guitar fret benders are really mild radius compared to this stuff!

IMG_20150824_202506_22_.jpgImage Enlarger

IMG_20150824_202508_23_.jpgImage Enlarger

"If you practice with your hands you must practice all day. Practice with your mind and you can accomplish the same amount in minutes." Nathan Milstein

Avatar
coolpinkone
California, the place of my heart
August 27, 2015 - 5:00 pm
Member Since: January 11, 2012
Forum Posts: 4180
sp_UserOfflineSmall Offline


Very cool... what awesome work!  Can't wait until fingerboards arrive. 

Vibrato Desperato.... Desperately seeking vibrato

Avatar
cdennyb
King for a Day, Peasant for many
August 30, 2015 - 3:56 am
Member Since: February 13, 2012
Forum Posts: 1818
sp_UserOfflineSmall Offline


Thank you Toni, I'm excited and nervous as well. Soon...

Well I knew it would happen... I'm so impatient when a weekend approaches and I have no other projects to work on! facepalm


I took a piece of maple scrap that was thick enough and made a couple of fingerboards, to spec so to speak... and used one to do some practicing on. The saw worked perfectly, the fret bender worked perfectly and when I was finished with this little 3 hour "learning" hands on experience I feel a lot more confident about attacking a new fingerboard of ebony.

20150828_1632161.jpgImage Enlarger

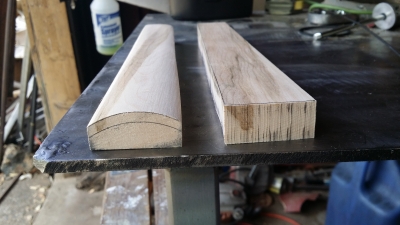
This a blank and a semi shaped result of trimming a little.

20150828_1656451.jpgImage Enlarger

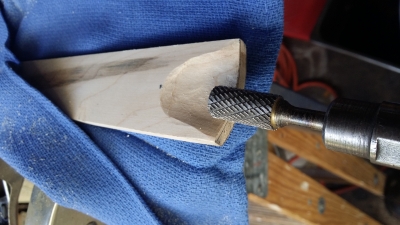
Grinding the underside relief.

20150828_1703421.jpgImage Enlarger

All sanded and shaped. Ready to start cutting on.

20150828_1703471.jpgImage Enlarger

Here's the fret bender in action.

 And the final result of one piece of fret wire to use as a test.

IMG_20150829_1918431.jpgImage Enlarger

"If you practice with your hands you must practice all day. Practice with your mind and you can accomplish the same amount in minutes." Nathan Milstein

Avatar
cdennyb
King for a Day, Peasant for many
August 30, 2015 - 10:04 pm
Member Since: February 13, 2012
Forum Posts: 1818
sp_UserOfflineSmall Offline


10sp_Permalink sp_Print
0

Here's a video I just uploaded of the jig in operation.


"If you practice with your hands you must practice all day. Practice with your mind and you can accomplish the same amount in minutes." Nathan Milstein

Avatar
Fiddlerman
Fort Lauderdale
September 1, 2015 - 11:06 pm
Member Since: September 26, 2010
Forum Posts: 16537


11sp_Permalink sp_Print
0

Very cool. Look forward to seeing the end result.
Thanks for the video. :)

"The richest person is not the one who has the most,
but the one who needs the least."

Avatar
coolpinkone
California, the place of my heart
September 2, 2015 - 10:41 am
Member Since: January 11, 2012
Forum Posts: 4180
sp_UserOfflineSmall Offline


12sp_Permalink sp_Print
0

Wow.... This is a great project to follow.  Those frets look great!  

Vibrato Desperato.... Desperately seeking vibrato

Avatar
Fiddlerman
Fort Lauderdale
September 6, 2015 - 8:53 am
Member Since: September 26, 2010
Forum Posts: 16537


13sp_Permalink sp_Print
0

Dennis - I don't know if I missed it but what kind of glue are you using with the fret wire?

"The richest person is not the one who has the most,
but the one who needs the least."

Avatar
cdennyb
King for a Day, Peasant for many
September 7, 2015 - 12:58 am
Member Since: February 13, 2012
Forum Posts: 1818
sp_UserOfflineSmall Offline


14sp_Permalink sp_Print
0

There's actually no reason to use any glue. Not only is it very messy and would be very difficult to get off close up next to the tiny fret wire but they are installed in a slot with a tiny interference fit.

stew-mac-page.JPGImage Enlarger

You can see in this photo of the fret itself, the tiny "teeth" along the tang edge face. These stick out past the .023" width of the slot I cut. The slot is so precise that it doesn't require any glue to retain that wire, in fact it's necessary to use a special pair of pliers to lift as you squeeze the sides of the fret should the need ever arise to remove one.

I use an arbor press to install them equally all the way across the 42mm curved surface of the fingerboard. You can't really pound them in with a hammer although it is done with heavier harder frets on a guitar fretboard. These are very soft and sensitive to the hammer face and it will dent them if done incorrectly...so in order to not damage the fret, I roll it on the fret bender to a radius slightly less than the 42mm so the center of the fret sticks up a tiny tiny bit and each end of the fret touches the fingerboard...then I place it under the press and gently push it into the slot.

Then after all 24 are installed, I will go over the frets with a leveling block and make sure all of them are equally high off the board, and then use a tiny diamond file to dress the edges and ends so they are smooth to the touch.

sp_PlupAttachments Attachments

"If you practice with your hands you must practice all day. Practice with your mind and you can accomplish the same amount in minutes." Nathan Milstein

Avatar
Fiddlerman
Fort Lauderdale
September 7, 2015 - 11:17 am
Member Since: September 26, 2010
Forum Posts: 16537


15sp_Permalink sp_Print
0

Interesting. :)
Thanks

"The richest person is not the one who has the most,
but the one who needs the least."

Avatar
cdennyb
King for a Day, Peasant for many
September 9, 2015 - 12:24 am
Member Since: February 13, 2012
Forum Posts: 1818
sp_UserOfflineSmall Offline


16sp_Permalink sp_Print
0

OK sports fans...

Here's the process after the slots are cut.

first you have to get the dots installed. Cut a very precise 3mm in diameter hole exactly between the slots in the correct spot. Handle the black Mother of Pearl dot with tweezers and then press it into the hole only flush or a little above the surface. If they end up slightly above you have to sand them down before going further.

P9080148.JPGImage Enlarger

P9080150.JPGImage Enlarger

Then you have to cut the bent fret wire long enough to span the fingerboard and press it into the slot without damaging the slot of the top surface of the fret. I use a hardwood block with a curve matching the finished curve of the fret so it evenly is inserted into the fingerboard slot.

P9080160.JPGImage Enlarger

P9080162.JPGImage Enlarger

P9080163.JPGImage Enlarger

The hardwood block still gets a groove from the very hard stainless/nickle fret wire so it helps to guide the fret in a straight line across the slot.

P9080170.JPGImage Enlarger

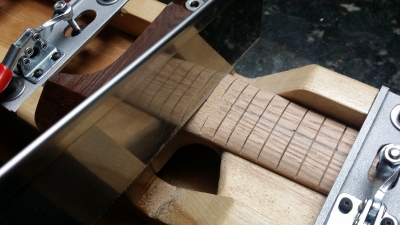
After the frets are all installed, the long ends are trimmed on a belt sander and finished with a very fine file and sand paper. A straightedge is placed across the frets to insure they are all level.

P9080171.JPGImage Enlarger

P9080185.JPGImage Enlarger

P9080190.JPGImage Enlarger

The final leveling is done with very fine paper and then the frets are progressively polished with finer and finer grit paper until I'm using 1000 to 1200 grit the last time.

P9080187.JPGImage Enlarger

sp_PlupAttachments Attachments

"If you practice with your hands you must practice all day. Practice with your mind and you can accomplish the same amount in minutes." Nathan Milstein

Avatar
cdennyb
King for a Day, Peasant for many
September 9, 2015 - 1:49 am
Member Since: February 13, 2012
Forum Posts: 1818
sp_UserOfflineSmall Offline


17sp_Permalink sp_Print
0

I don't think there's a pic of my 5 string in this thread that I'm putting this fretted fingerboard on so here it is for everyone to see.P3130137.JPGImage Enlarger

sp_PlupAttachments Attachments

"If you practice with your hands you must practice all day. Practice with your mind and you can accomplish the same amount in minutes." Nathan Milstein

Avatar
Fidelestre
Texas
September 9, 2015 - 6:31 am
Member Since: June 21, 2015
Forum Posts: 240
sp_UserOfflineSmall Offline


18sp_Permalink sp_Print
0

@cdennyb ,

This has been an interesting project to follow. Did you make that 5-string violin yourself?

Are those ukulele pegs on a ukulele neck? Did you carve the neck from scratch, or modify a prefab blank ukulele neck to make the thicknesses match?

I'm going to try making a very simple "cigar box" fiddle as a demo for a science project I'll be doing with some 6-8 year olds. (They'll make instruments from a tissue box and rubber bands, and I'll show how a few modifications will - hopefully - give a better sound with more options for choosing pitch.) Was thinking of just placing a violin fingerboard on top of a blank ukulele neck, but of course the neck will be wider than the fingerboard.

It will be great to see your fretted fingerboard in action!

Avatar
cdennyb
King for a Day, Peasant for many
September 9, 2015 - 12:23 pm
Member Since: February 13, 2012
Forum Posts: 1818
sp_UserOfflineSmall Offline


19sp_Permalink sp_Print
0

Well, to answer your many questions...

I did not make this violin, I purchased it from Yinfente in China. They maintain several different seller accounts for guitars, violins, parts, supplies, etc. Here's one of their 5 string violins like mine. They don't have many of these for sale and the neck and peg area seems to be one of their original fabrications. It really caught my eye so I took a chancer and bought it several months ago and I'm very satisfied with their workmanship and quality off the parts and pieces. Beware of inferior copies.

http://www.ebay.com/itm/New-5-.....21020b0a2d


I think the pegs are something very interesting to say the least, very much like miniature fender guitar pegs. Ha.

As far as the fingerboard I made, I took measurements of the existing board... width narrow end is 28.9mm and big end is 44.8mm but this one is a little shorter than a "standard" fingerboard, only going as far a a decent amount past the last fret The remaining board isn't used so why have it there.

As to your last item of interest, seeing it in action... I currently have a fretted fiddle applique attached that 'simulates' frets so I could get an idea of what I needed and what it would feel like. It took a day to get used to but after now playing on it I find it second nature to use and slides, vibrato, etc are all the same as it was before fretting.

P6140041.JPGImage Enlarger

sp_PlupAttachments Attachments

"If you practice with your hands you must practice all day. Practice with your mind and you can accomplish the same amount in minutes." Nathan Milstein

Avatar
BillyG
Brora, North-east Scotland
September 9, 2015 - 1:44 pm
Member Since: March 22, 2014
Forum Posts: 3746
sp_UserOfflineSmall Offline


20sp_Permalink sp_Print
0

I'm liking it, Denny !

I seriously recommend not copying my mistakes. D'oh - guntohead.JPG

Please make your own, different mistakes, and help us all learn :-)

Forum Timezone: America/New_York
Most Users Ever Online: 696
Currently Online: Gordon Shumway
Guest(s) 73
Currently Browsing this Page:
1 Guest(s)
Members Birthdays
sp_BirthdayIcon
Today VirginViolinist, Cearbhael
Upcoming PaTooDoNaLD, Almandin, Picklefish, Tammy, goettjp, Griff, sus49, Ogre, djroger, marcnaz, Cleverpun, The Modesto Kid, Burnett393, eugenephilip572
Top Posters:
ELCBK: 8863
ABitRusty: 4306
Mad_Wed: 2849
Gordon Shumway: 2756
Barry: 2690
Fiddlestix: 2647
Oliver: 2439
stringy: 2400
DanielB: 2379
Mark: 2274
Member Stats:
Guest Posters: 3
Members: 31759
Moderators: 0
Admins: 8
Forum Stats:
Groups: 16
Forums: 84
Topics: 10873
Posts: 138136
Newest Members:
F7b5, Llwyarch, Ken Ruhnke, jeni2024, Goldenbow, joanie, hunmari01, lydia.vertu SP, Thavence SP, tcaron21
Administrators: Fiddlerman: 16537, KindaScratchy: 1760, coolpinkone: 4180, BillyG: 3746, JoakimSimplePress: 0, MrsFiddlerman: 2, Jimmie Bjorling: 0, Mouse: 6104