Welcome to our forum. A Message To Our New and Prospective Members . Check out our Forum Rules. Lets keep this forum an enjoyable place to visit.
Currently working on errors from the latest (SimplePress) forum update. Many issues have been resoled and others are being worked on. Thank you for your patience.
 Topic RSS


 (4 votes)
  Offline
Hi all,
I recently got a cheap violin and I'd like to bring it back to life. First I wanted to build a violin from scratch, but I have to admit that this is beyond my capabilities in sense of time and equipment. Thus I thought it would be easier to just restore a violin.
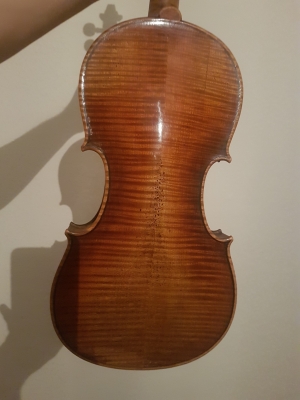
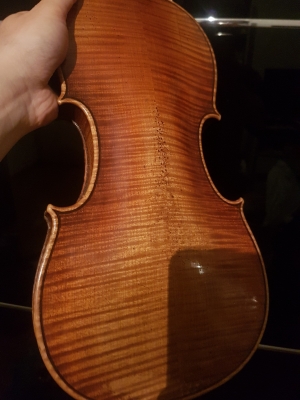
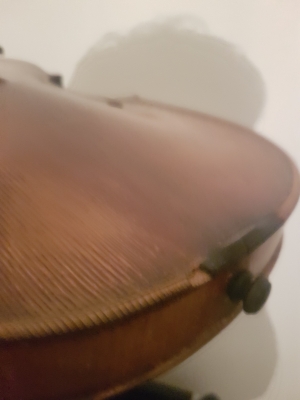
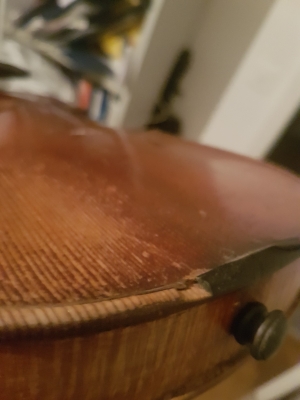
And here we are. I'd like to repair the small chip, where the finetuner is attached and to improve the varnish on the top. As I've read, the part under the bridge could be done on purpose, because of the better transmission of the sound. But as you can see, the varnish where the chinrest should be is pretty destroyed. There are also parts where some scratches are present, but this is not visible on the pictures.
Do you have any recommendations on how to proceed with the varnish? What products do you recommend and in which order should I apply them? First grind all the varnish away with sandpaper or is it better to remove it with some alcohol?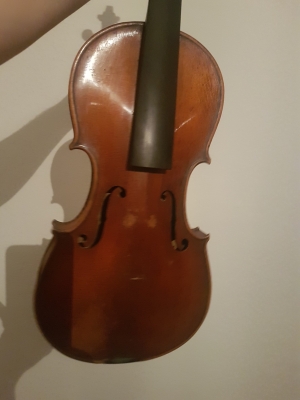

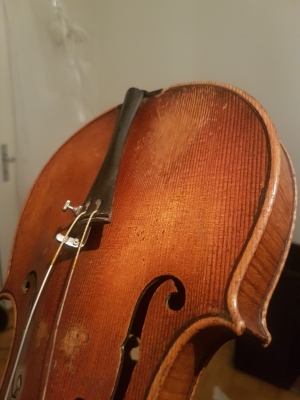

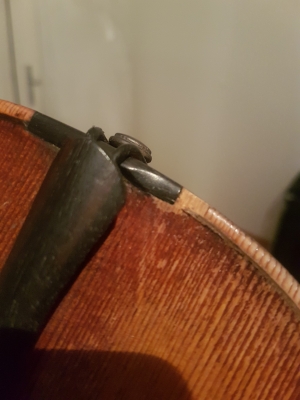

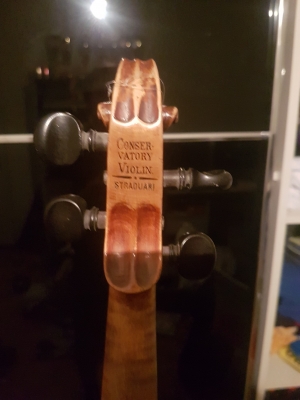

I kindly appreciate any tips and tricks!
Best regards
Rokit
Regulars


Whew. What you have there is a lovely violin, and in my humblest of opinions I wouldn't do anything to it except put a chinrest, bridge and strings on, tune it up and enjoy it. The varnish is fine, and you may learn to love it the way it is. Shiny isn't necessarily good. Alcohol (and most other solvents) will remove the varnish, and overcoating it with anything will destroy that lovely patina (all that history...).
If you are committed to refinishing it, take expert advice, read widely and be prepared to hand the violin to a professional luthier if you have any doubts about your competence.
Anyway, lecture over!
Welcome to the friendliest fiddle forum: ask any question, browse @Fiddlerman's superb educational videos shown at right, and when you feel ready, post a video of your progress in the "Critique Video" section for encouragement and advice.
Peter
"It is vain to do with more that which can be done with less" - William of Ockham
"A crown is merely a hat that lets the rain in" - Frederick the Great
Regulars
 Offline


Regulars
 Offline


@rokit - first of all, welcome to the forum, enjoy your fiddle/violin playing journey !
In regard to your original questions, as an avid DIYer myself, sure, I can understand the desire to make it look nice and new and shiny. However, in such circumstances, this being a violin with a playing-history - I'd hold back, and largely agree with what @peter said !
I had a sort of similar situation with one of my instruments. I won an auction on ebay for a 3/4 size violin - described as "needing work" LOL. My reason for the purchase HAD been to practise some luthiery, disassemble / re-assemble the whole thing (just for the learning process, and making any repairs necessary).
BUT - on receipt - tattered, battered, dinked (rofl, technical term) and scratched - the only real thing wrong with it was the peg-box and pegs (which appeared to have been shaped with a chain-saw!) It was so bad, the pegs wouldn't lock in position, and suddenly lurch back into a more stable position depending on the various ridges and grooves on both the pegs and peg-box holes!
Nothing structural, no cracks, no open seams - no visible structural problems. So, I decided just to re-do the pegbox and pegs. Fortunately, although obviously previously reamed out (well I say "reamed-out", but the peg-box holes could equally have been re-shaped with a pen-knife blade or miniature file) - only relatively little damage had been done, and using a standard reamer for the peg-box and a peg-shaver for the new over-size pegs - it was back in action.
I had almost been hoping that the peg-box holes were already too-far oversize for the new pegs, and I would get an opportunity to attempt one of the various bushing techniques - but - ended up not needing to do that. [ Although, disappointed as I was ( ! ) I had already fabricated a "sacrificial pegbox" from some scrap timber to try out the bushing process on that - with well - reasonable success - before I would have done it on the actual peg-box, so not all was lost!]
I know NOTHING of the history of this cheap, mass produced 1920's instrument - but - the point is, she has clearly been played a LOT over the years. She has a unique voice compared to my other normally sized instruments, and I rather suspect that a lady of such grand age is happy-in-her-own-skin and probably wouldn't really appreciate a "make-over" 
All the best with your project, however you decide to proceed ! Keep us updated !
I seriously recommend not copying my mistakes. D'oh -
Please make your own, different mistakes, and help us all learn :-)
Regulars
 Offline


Regulars
 Offline

@rokit . Welcome to your first (mild) disagreement on this forum. I do not think you purchased a cheap violin. I think you got a very nice antique trade violin at an inexpensive price. Big difference.
The worn area of the varnish is confined for an area which would normally be hidden by a chin rest. This means to me that a previous owner did not use one and that facial hair or sweat wore away some finish. No big deal. I would gently clean off the surface with naphtha (lighter fluid) on a cotton undershirt and apply a coat of paste wax.
Your tail piece gut appears to be made of actual gut. I would upgrade that to a new one. Wittner makes a wire cable one with adjustment screws that is worth the few dollars over the more common nylon versions.
That violin deserves the use of a piccolo style fine tuner on the “e” string. A variant made of titanium is a worthy consideration.
My favourite violin bridge is marketed as “Cinderella” from China. I would purchase 5 with the hope of making 2 good ones. Look up my bridge roasting thread for additional fun.
Other needs are chin rest, shoulder rest, strings, bow, and rosin. Enjoy the journey.
The pegs look ok to me.
Success is the progressive realisation of a worthy ideal. —Earl Nightingale.
Regulars
 Offline


 Offline
@BillyG
what a lovely text!
@Peter
@Gordon Shumway
I guess you're right. Maybe I'll just try to clean it a little bit, put some new strings on and check how it sounds.
I'm in the mountains until tomorrow. But I will post a video of the violin in action, when it's ready. In the meantime I'm still open for any recommendations. Also, if you have some suggestions for strings for such a violin - let me know.
Regulars
 Offline

@rokit . If you have access to bungee cord, I would make a retainer with it to slightly compress the center of the violin corpus, thus retaining the sound post as you work on the violin.
String selection is slightly premature because you do not know how high the bridge is going to be at this point. If the bridge does not need to be radically reduced, violin strings with a perlon core would be a good choice. The fiddlerman store brand is not too expensive in the United States and they play well. This cost may be off set from over seas shipping and duty.
If you need to cut off a lot of bridge due to neck angle or corpus carving profile, you may need to go with steel core strings to achieve a good sound volume. Typically, this type of string cost about 1/3 of that of a perlon core string.
Success is the progressive realisation of a worthy ideal. —Earl Nightingale.
Regulars
 Offline

@rokit . If you have access to spruce, pigment (water colours, oil paint, or leather dye), woodworking tools, woodworking glue, and shellac, go for the repair. No further harm will be done to the violin if left alone. Damage will have no acoustic significance.
I do not know the climatic conditions of your regions. You may want to add a humidifier to the case. I posted an easy diy humidifier in another tread here.
Success is the progressive realisation of a worthy ideal. —Earl Nightingale.
Regulars
 Offline

@rokit . Another thought. After a second view of your provided photos. It appears to me that the ebony wood saddle is shorter on the side of tailpiece than the opposite side. I think the exposed wood is due to a chip breaking off the original saddle. If so, it would be a rather easy matter to replace the saddle (equally easy to do so if they are currently equal).
Success is the progressive realisation of a worthy ideal. —Earl Nightingale.
Regulars
 Offline

@rokit . The old saddle is likely held on with hide glue. It is tenacious at room temperature but returns to a liquid at about 100 c. Find something similar to a very thin butter knife (with no sharp edges), heat blade with an electric hot iron or similar and gradually introduce blade under the saddle.
The new ebony saddle is likely to be oversized. When machined to match old, apply a little acetone to underside before application of glue to remove wood oils. That makes it secure better. White wood glue would work fine, since the tail piece gut is acting on it in compression.
Success is the progressive realisation of a worthy ideal. —Earl Nightingale.
1 Guest(s)


 Log In
 Register


