Welcome to our forum. A Message To Our New and Prospective Members . Check out our Forum Rules. Lets keep this forum an enjoyable place to visit.
Currently working on errors from the latest (SimplePress) forum update. Many issues have been resoled and others are being worked on. Thank you for your patience.
 Topic RSS


 (18 votes)
 Regulars
 Offline

I have wanted to try a violin bow made from split bamboo. And I wanted the bow shaft to be eight sided without the use of any scarf joints.
Conventional technique for the making of split bamboo fly rods requires the use of six segments shaped using a wood plane resting on a special (expensive) adjustable steel form. I happened upon a video of a rod maker using an unusual planing device. I immediately reasoned that I could modify this technology to meet my needs. See 2:40 of the linked video.
This thread will follow my process in making a violin bow with a split bamboo stick. My only planned purchases will be the frog (Glasser plastic) and horse hair. The basic concept can be adapted to accept wood as well. Fractional bows, viola bows, and cello bows should be possible. No clue about double bass bows.
Success is the progressive realisation of a worthy ideal. —Earl Nightingale.
Regulars
 Offline

@ELCBK and others. Regarding proper taper, we may need to do a deep dive.
The general scientific geometric model assumes an expression of taper from the Tourte violin bows. This was done by W.S.B. Woolhouse. The variable h denotes the distance of any part of the bow from the head.
diameter, mm = 5.08 (log(h + 184) - 1.2150)
diameter, inch = 0.2 (log(h + 7.25) - 9.81)
It is also possible to create a taper directly from measurement of an existing implement. My taper form has a 4 inch adjustment interval, so relatively few measurements need to be made in this regard.
Another taper problem is that the mechanical properties of bamboo are different from wood. I should be able to make the bamboo bow thinner (and lighter) than a wood counter part. I see many carbon fibre bows that mimic the dimensions of wood bows. I suspect that the mandrels were created without regard to the relative strength of the underlying materials and more toward aesthetic properties.
Success is the progressive realisation of a worthy ideal. —Earl Nightingale.
Regulars
 Offline

My first thought about providing a logo was to use a laser engraver. I do not have one of those and the length of the stick would likely necessitate cutting a hole in the side of the engraver. Not ideal. And an error in engraving would ruin the stick.
This method looks useful and cheap. The effect should be lasting if protected with finish.
Success is the progressive realisation of a worthy ideal. —Earl Nightingale.
Regulars
 Offline


@Irv -
Looks GREAT!
Resorcinol glue was used prior to epoxy resin.
https://en.wikipedia.org/wiki/.....nol_glue
Will you have to make more than one shape blade for your plane?
Will you be doing any shaping from within?
What heat source will you use to straighten & shape the bamboo with? I have a ribbon burner for my glass (oxygen/propane) - the C-shape burner in the video is very interesting.

...can't help but be curious! 😁
- Emily
Regulars
 Offline

@ELCBK . Once the raw strips are created (I plan to use a wood band saw with a thin curf metal cutting blade), only one set of carbide inserts will be used to shape the strips. I have three cutting edges on each insert and I am told that I can swap the inserts left to right to double potential use out of them. I got the inserts for $1 each shipped from China, so durability is not an economic issue.
Another insert holder will be used to form the frog end bore needed for the frog advancing screw. The same insert holder could be used to remove material from the interior if it is deemed desirable to lighten the stick. I do not know if glue will just fill the channel. Experimentation will be necessary to answer this.
I do not think it will be necessary for me to straighten the bamboo using the material I have selected. I will remove moisture and roast the strips in a vacuum oven for a few minutes.
The C shaped burner in video is indeed very interesting. It is likely from a European manufacture. I have not been able to source one yet.
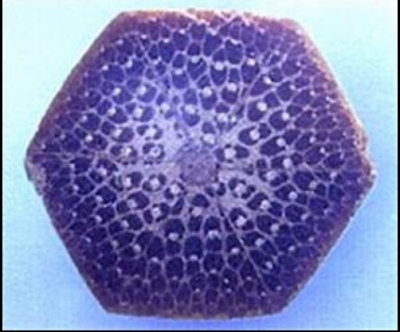
I have a photo of a cross sectional view of a conventional six sided bamboo bow. My goal is to have something similar, but with eight sides.
Success is the progressive realisation of a worthy ideal. —Earl Nightingale.
Regulars
 Offline

Once glued, the bamboo strips must be bound with string to assure alignment. Care must be made to have an equal amount of string wound in opposite directions so that the force resultants from string pressure cancel out. Various contraptions have been created to do this task by split bamboo craftsmen which spins the bamboo assembly as the string is applied. The common fault is that the spinning causes minute particles of glue to dislodge and adhere to the contraption.
This gentlemen has reduced the problem to first principles and made an elegant solution that does not suffer due to flinging glue.
Success is the progressive realisation of a worthy ideal. —Earl Nightingale.
Regulars
 Offline


@Irv -
Great clamping technique!
Meant to ask about applying your logo.
Have you considered a branding iron - for a faster and more permanent, but cost effective, solution?
Electric branding irons might be an option and low-end desktop laser engravers are now reasonable, too.
But, custom brass logo stamp heads for branding irons/electric branding irons are only a few dollars - little more with handle on Etsy, etc...
I'm sure you can find a way to clamp or screw one of those custom brass heads to a soldering iron - or to a burner from a cheap wood burning kit.
For the method in your video, I have never been able to find a water-based sealer worth using for outdoors.
Thank you - this is great fun learning about all of this process.

...hope my questions and comments are not seen as impertinent - never meant to imply anything, just feed my curiosity.
- Emily
Regulars
 Offline

@ELCBK . My z axis on the jig borer is very limited. I had those eccentric clamps for years and it was the first time I ever used them on a project. The most time consuming part of any operation is clamping (at least for me).
I have never used anything to transfer ink to a wood surface. I think the area is too fussy for silk screen. I guess I will try it and see. I am considering using clear silk thread winding toward the tail end of the stick to resist the compression load from the frog button screw (and from drops). Once covered in finish, the thread becomes invisible.
I tried to find a branding iron for another project. I could not find anything for under $150.
Success is the progressive realisation of a worthy ideal. —Earl Nightingale.
Regulars
 Offline


@Irv -
Did you say what material you are using for the frog?
These are all just craft tools, but should be okay for this branding in this application. Heat it up & find a way to quickly line it up where you want!
...and practice. (lol)
All these say free shipping.
Searched on Amazon.
Custom Logo Wood Branding Iron,Durable Leather Branding Iron Stamp,BBQ Heat Stamp Including The Handle (1x1") - starting at $34.99 (needs heat source)
Custom Electric Wood Branding Iron with Custom Stamp 200W 110V (Electric Iron only) - $74.99 + stamp ($10 on up at Etsy)
Similar products to search on Etsy.
https://www.etsy.com/search?q=.....ing%20iron
Btw, I've bought many materials and products from individuals/artisans in different Countries thru Etsy over the years - always a great experience.
I haven't haven't given too much thought to a good, easy way to modify an old soldering iron to hold a stamp. A custom brass logo stamp by itself can be bought cheap, starting at $10, but I'm not sure - suspect there might be a threaded hole in the back. Maybe you can tell better from some of the photos, or ask.
...bamboo violin!
Playing some fiddle while you're at it?
- Emily
Regulars
 Offline

@ELCBK and, hopefully, others.
As stated in the first post, I plan to use a Glasser plastic frog. The design is a copy of the Heddon bow and is light weight. The making of a conventional wood frog can be done but I could not be bothered in the process. It would also involve very large router cutters which are, to me, unnecessarily dangerous.
It would not be too difficult to build a fixture to align the branding iron to the stick. I have a bow making book where this was done. I am frankly more interested in the making of the bow than I am in marketing it.
Regarding the bamboo violin. I have more interest in making a fractional violin using composite methods. I intend to use silk cloth as the structural material. I am particularly intrigued with incorporating the bass bar into the topography of the top plate mould. But that will be the subject of another thread.
Success is the progressive realisation of a worthy ideal. —Earl Nightingale.
Regulars
 Offline

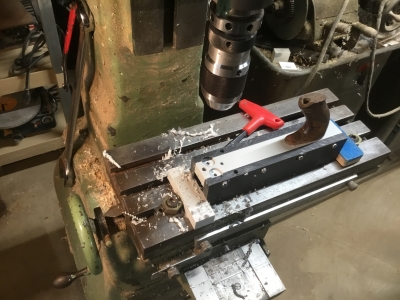
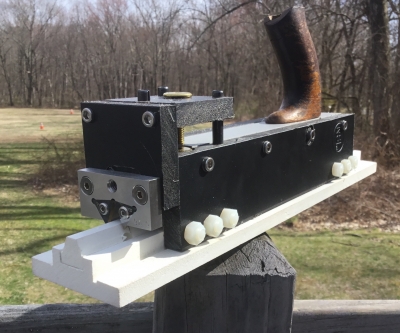
The hand plane is going to remove a few thousands of an inch of material with each stroke. It utilizes three bolts (a limit stop, a push stop, and a pull stop) to adjust cutter height, and two will need adjustment for each pass. This device is adequate for “proof of concept.” But something faster that would form a completed strip on one pass would obvious be better for production.
This device (based on a Stanley power plane) will do just that. Commercial router bits are not available in the geometry needed, so the user made sanding disks (see photo below. I think I could recut bits to the proper shape given access to a wire EDM device or similar.
Success is the progressive realisation of a worthy ideal. —Earl Nightingale.
Regulars
 Offline

David Zimmerman of Montana also made a six sided split bamboo violin bow. I do not know if he is still active in their construction. He used a dovetail joint to connect a wood head to the bamboo shaft (see photo). This is an easier technique than that used by Cocker. It might be possible to use a lost wax molding process to create a more robust head out of metal.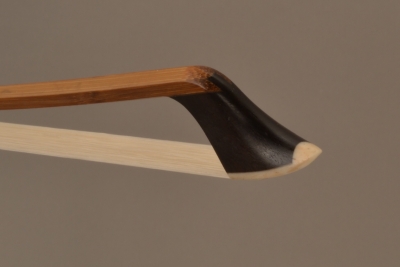

Success is the progressive realisation of a worthy ideal. —Earl Nightingale.
Regulars
 Offline

A final approach of constructing a bow head I am considering is an elegant solution employed by the French bow maker Gilles Nehr (see photo). The nice thing about this approach is that I could use a Cricut Cake machine to cut out the wax shapes and make the heads using investment casting (which I have never tried). Once the basic shape is designed, it should be possible to make it bigger or smaller by the computerized scale function for the various string instruments and fractions thereof. 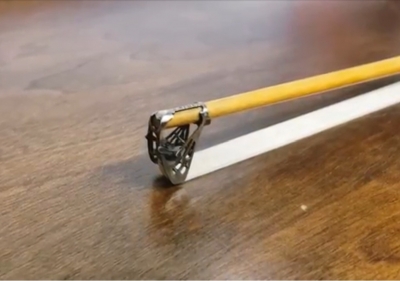

Success is the progressive realisation of a worthy ideal. —Earl Nightingale.
Regulars
 Offline

Lawrence Cocker (England, 1908-1982) constructed six sided split bamboo bows for a number of years. The cocobolo wood heads were attached using an elaborate spline joint, a detail that would be difficult for me to facilitate (see photo).
I 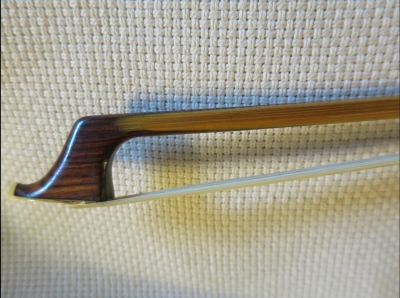
 am sorry if it appears that this post is out of sequence. No clue what happened to the one that was previously submitted. I likely offended.
Success is the progressive realisation of a worthy ideal. —Earl Nightingale.
1 Guest(s)


 Log In
 Register


