
Welcome to our forum. A Message To Our New and Prospective Members . Check out our Forum Rules. Lets keep this forum an enjoyable place to visit.
Currently working on errors from the latest (SimplePress) forum update. Many issues have been resoled and others are being worked on. Thank you for your patience.
 Log In
 Register

 Topic RSS
 (0 votes)
Members
 Offline


I just don't like those plastic tubes on the strings. I don't know how much they affect the sound, but I figure they have to mess it up at least a bit. Besides that, I think they just look crappy.
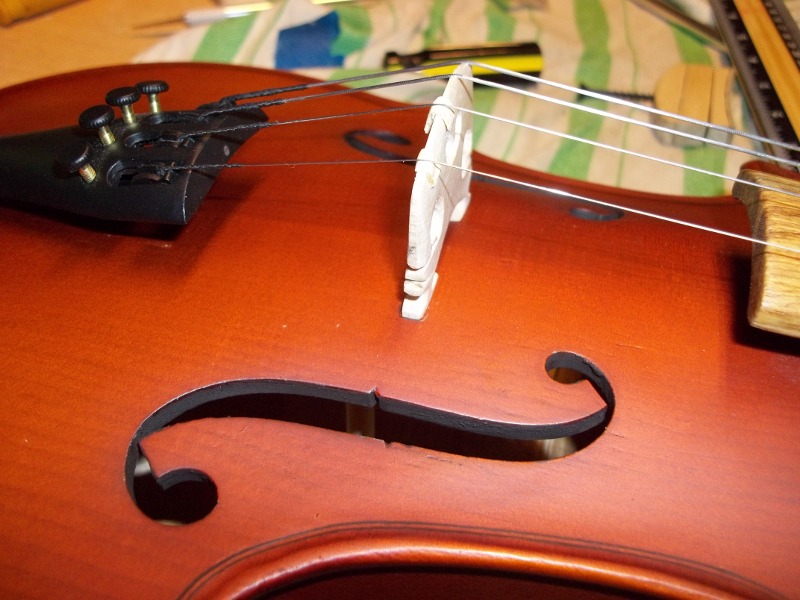
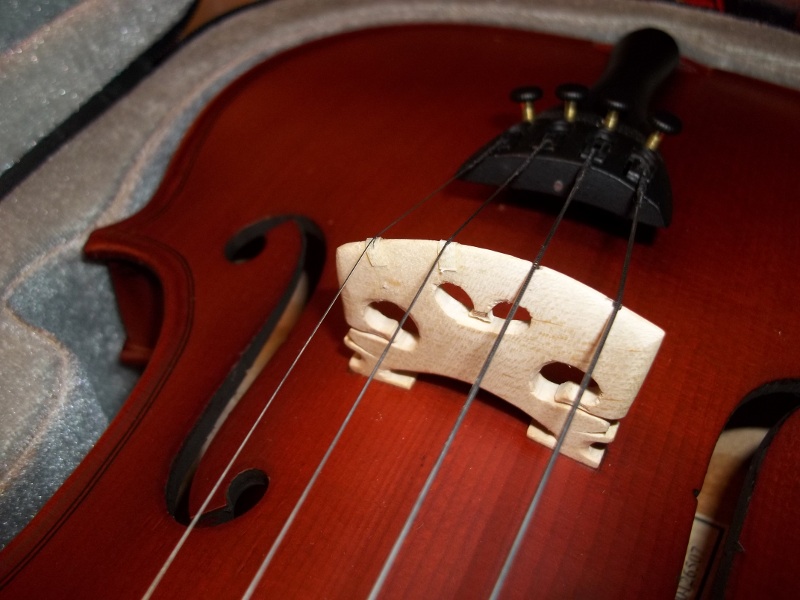
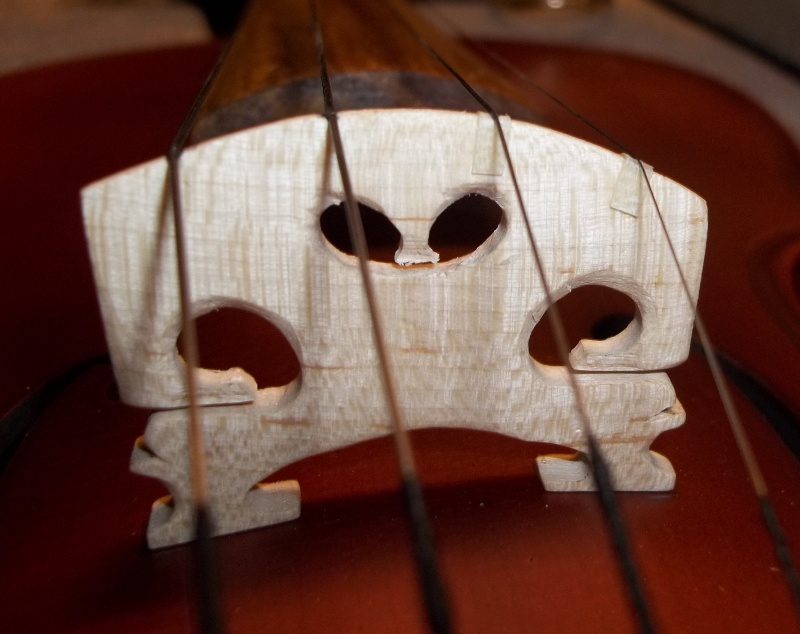
This is one of those fixes where I messed it up the first time and had to re-do. I didn't have any actual factual parchment handy, and I'd seen in some places on the net where they said thin leather would work. So in one of the pics you'll see some thicker stuff glued to the bridge than in the final pics.
"Experience is what you get when you don't get what you wanted."
Leather can be sliced very thin, but then it isn't very strong. I found I had to leave it almost 1mm thick to have something the strings didn't pretty much just cut right through. Problem with that is it affected the height of the strings, and raising the A string that much made the A, D and G almost level. Less than 1 mm of difference in height. That made it very hard to bow the instrument and get anything like a clean note.
So I was stuck looking at it and deciding whether to go back to the tubes, or maybe recut the curve of the bridge to make up for the extra height caused by the leather being too thick. I ended up doing the sensible thing and calling a musician friend who makes his own small hand drums sometimes and bumming a scrap of nice real goatskin parchment. He dropped by with a piece he had gotten for a little drum and then decided he didn't like one edge of. Maybe a 6 inch roughly circle shaped piece. Maybe only enough for one very small drum, but I'd guess one could probably do 40 or 50 violin bridges with that one piece. I gave him a return-prezzie of some old small bits of drum hardware I had around. I'm not a drummer, and don't have a use for it, he is a drummer and it might save him a trip to the music shop sometime.
Fellow musicians are often your best source for small parts and odd bits you need for a project. Often they will understand better than anyone else on the planet what it is like to try and get an instrument up and playing or do a cool little mod or upgrade that most non-musician friends wouldn't even notice.
The parchment is very thin and tough. Considerably less than 1mm thick, and then I sanded the rough side of it with some 600 grit and I'd say by the time I was ready to put it on, it was maybe at most a quarter of a mm thick.
I cooked up a tiny batch of hide glue and put the parchment on by putting a tiny bit of the hide glue on one end of a strip I'd cut of it, (maybe a little over 2 mm wide), touching it to the back side of the bridge and holding it steady until it "grabbed" well. Then let it sit for a few minutes to harden some and then put a teeny drop (tiny and teeny here indicate amounts you can apply with the pointy end of a pin) and I pulled the strip tight across the top of the bridge and down across the drop of glue on the front. Then trimmed the excess parchment off carefully with a razor and scraped off the little bit of excess glue.
For those getting bored with the long post, I'll just say it seems to have worked quite well. Other than a slight "settle" of the strings into the parchment, 24 hrs later the strings aren't cutting in at all, and I think those strings sound a bit better without the plastic tubes.
But while I had the violin partway taken down anyway.. I decided to do a little more work. I re-sanded the bridge feet to make absolutely sure they were a really good fit. I haven't been 100% happy with the tone of the instrument yet, and I figured I may as well make sure the feet of the bridge were making as close to perfect contact as I could manage. I scribbled over the part of the feet that touch the top of the violin with pencil, then taped a piece of 600 grit sandpaper on the violin top and used it to sand the feet until the pencil marks were gone. Then I went a bit further into obsessive and stretched some thin silk over the top and buffed the feet on that for a while. I checked it in a dark room with a laser, and the fit was light-tight. If anybody can beat that for picky, I want to hear about it. LOL
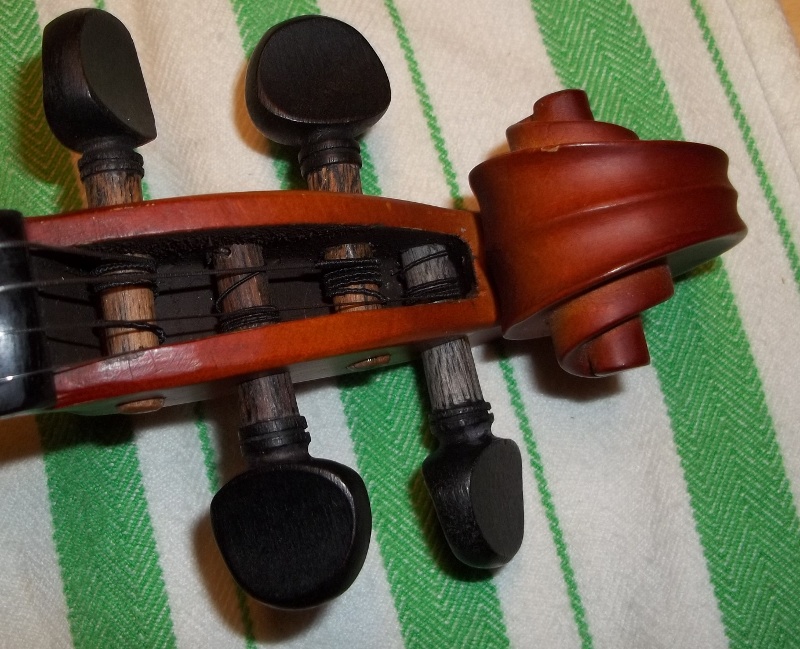
Also, while the instrument was partially taken down anyway, I decided to trim and round the ends of the tuning pegs, paint the inside of the pegbox and paint the inside edges of the F-holes. Those are all really aesthetic/artistic touches, but it is important to like how your instrument looks. Not saying a violin has to look like a textbook or museum picture. But it should have a look you personally like. Beautiful wood and finish, pink with sparkles, black and shiny, whatever.. But if you like how it looks it is just more enticing to play and more enjoyable to handle. Point of pride. With cheaper instruments, the detailing will usually be one of the places where the work was done poorly or not at all. Fixing those little bits up can be part of making it feel and look a bit less cheap. They won't make a Strad out of a 60$ fiddle, but every little bit adds up.
Anyway.. I'm, still not 100% happy with the tone/timbre of the D string. I'm pretty sure that is going to end up being an issue that will lead me into learning about soundpost adjustment. I do feel the E and A strings sound better now that the tubes are no longer needed. While the details of trimming and rounding he ends of the pegs and the little bit of painting are minor touches in my opinion, I like the effect and feel it gave the instrument more of a "finished" look. I'll put up the sound files in another post, since this one is already long enough with the pics.
"This young wine may have a lot of tannins now, but in 5 or 10 years it is going to be spectacular, despite the fact that right now it tastes like crude oil. You know this is how it is supposed to taste at this stage of development." ~ Itzhak Perlman
Members
Offline

And the sound samples. Because I know I know that I, for one, have a hard time getting an idea what an instrument is sounding like from just a few test notes, I played a little bit of a song I've been working on a bit lately. Not a great take, since everyone in the household is asleep so I was playing as soft and gentle as possible and only did one take and tried to ease in to the dynamics a bit rather than playing at a more normal volume. But it is basically her "whisper" voice, only about as loud as a normal speaking voice.
"This young wine may have a lot of tannins now, but in 5 or 10 years it is going to be spectacular, despite the fact that right now it tastes like crude oil. You know this is how it is supposed to taste at this stage of development." ~ Itzhak Perlman
Members
Offline
Hi Barry.
Yeah, it isn't exactly a pretty bridge at this point. It is the second bridge I've ever trimmed and the first one where I tried shaping the kidneys and heart and etc at all, so I'll blame it on being a clueless noob. ![]() LOL
LOL
Most of the pics I've seen only had the parchment under the E string. But both sets of strings I've bought so far had tubes on both the E and A, so I decided to play it safe since the manufacturer might know more about their strings than I do. Maybe they put tubes on the A as well because people complained about the A cutting into the bridge? I don't know.
The soundpost, about all that I will count on at this point is that where it is just as it came from the factory is probably the wrong place. It is about 5 mm behind the E foot of the bridge when the bridge is at 327mm from the nut. That is about half as far away as it was just as the instrument came from the factory.
But you can see what I've done with a bridge and can probably guess why I'm not eager to dive into trying to adjust soundposts. I figure it is probably most sensible to settle for just messing up one thing at a time.
![]()
But yeah, most likely I will have to do it eventually to get the tone sounding right or at least better.
"This young wine may have a lot of tannins now, but in 5 or 10 years it is going to be spectacular, despite the fact that right now it tastes like crude oil. You know this is how it is supposed to taste at this stage of development." ~ Itzhak Perlman

Daniel,
When you trim down the bridge try not to round it off but thin out the entire bridge. A rounded bridge like yours will not transmit soundwaves as efficiently as one that is flat and has sharp edges. If you dont like the tubes just don't use them. It will take quite some time for the string to cut into the bridge and if you are concerned with that use a bridge with an ebony insert.

Regulars
 Offline


Daniel, just noticed the thread and pics. Dude... you gotta finish the job on that bridge... You did read that article on making a backup bridge I wrote didn't you?
https://fiddlerman.com/forum/t.....ridge-pdf/
Study how I shaped the bridge... using a sanding block (very important) to keep it flat and edges sharp and clean and very slowly and carefull making the cuts and thins. The chops and hacks on the edges of the holes are not necessary...If you had done one at a time and made recordings and sound analysis you'd see that each one upsets the sound in a particular way... add all those together and it's like putting a handfull of m & m's in a blended with beer as far as the sound waves go.
Make a new bridge... throw that thing away and start over. Follow the pdf on making it and then at the last step add the parchment pieces. You'll be so much more pleased with the results.
I found that just taking two or three passes with the sanding block changed the sound a bunch! Just a couple of flat passes on the sand paper! Get my point? Lots of cuts make so many changes you have no idea which ones made it better and which made it useless.
you can do it...![]()
"If you practice with your hands you must practice all day. Practice with your mind and you can accomplish the same amount in minutes." Nathan Milstein
Members
Offline
Same old bridge as has been on this fiddle since I started working on it, gentlemen. Little if anything has been done to it since then other than re-sanding the feet as already mentioned, and I think at some point I sanded the sides a bit since they looked a bit wide. Not sure on that, it would have been a couple weeks ago. These pics are closer in, and maybe a bit more in focus, so what a kludge this particular bridge effort was is maybe a bit more visible.
This is an example of a first attempt to trim a bridge with knives, and to round assorted areas like the kidneys as per assorted pics and etc out on the Internet. I am aware that it is not a particularly stellar result.

And I do have another bridge that I have not started on yet, since I was dealing with other issues on this particular violin, and taking some time to get used to it being quite a different shape instrument than the electric I am far more familiar with. It seems seemed sensible to try and eliminate operator error before going further into the willy-nilly world of violin adjustments than I already have. When there is enough difference in the thickness of two instruments to require learning a considerably different set of bowing angles, it makes more sense to work on getting used to that a bit before the bridge and etc.
I have attached a pic of the electric bridge, which was my absolute first effort. As it came from the factory, it was uncut to an amazing degree. It didn't even taper. It was over 4 mm thick at top as well as bottom. LOL I block sanded what I guessed might be the better choice for a front face to tilt it back a bit, then cut the curve and notched for strings and thinned the shoulder a bit to get a thinner edge for the strings to rest on and that was all. At that point I hadn't found much in the way of a step by step process to follow and most of what i did was purely "by guess and by golly" from looking at a few pics. I hadn't even found this forum at that point to be able to ask questions. Pretty much a miracle that it ended up being even playable.
But what else are you going to do the day after your very first violin arrives in the mail? LOL I knew just about enough about stringed instruments in general to figure out the bridge was uncut and that it was a problem. First hint was that the action was almost unplayable and it had no notches for the strings. LOL
Anyway, I have met a total of one violin in person that I actually got to play and get close look at the parts of. That was a used Fender electric at the local shop. I more noticed that I didn't care for the neck, something just felt uncomfortable about the neck shape and the way the edges were radiused. The action felt stiff and the bridge looked a bit rougher than the one on my electric after the minor work I put into it, so I didn't figure it was worth much study. One of my daughters took half a year of violin when she was in school, but that was a rental and they took care of even string replacement, so I didn't make a close inspection of it and that was at least 15 yrs ago anyway. Hence my repeated reference to myself as a clueless noob in matters violin/fiddle. Not a stranger to music theory or guitars and similar stringed instruments, but they do not have anything as tricky as a violin's bridge. Learning curve.
Like I was saying, don't panic too much over this particular bridge. It's the same ugly bridge as before, I was just making the experiment to see if replacing the tubes with parchment was worth the trouble, and I believe it is. Better to try it first on the kludged bridge in case it really messed the bridge up badly. I have another bridge, and am taking more time to think rather than rushing right into hacking away at it. My third attempt at trimming a bridge may go better than the second one. LOL
@cdennyb: Denny, you're a great guy and I do appreciate all the analysis you've done. But logically, nobody can expect you to do analysis after analysis every time they sand on a bridge for one or two passes. You may have the patience of a saint, but you just 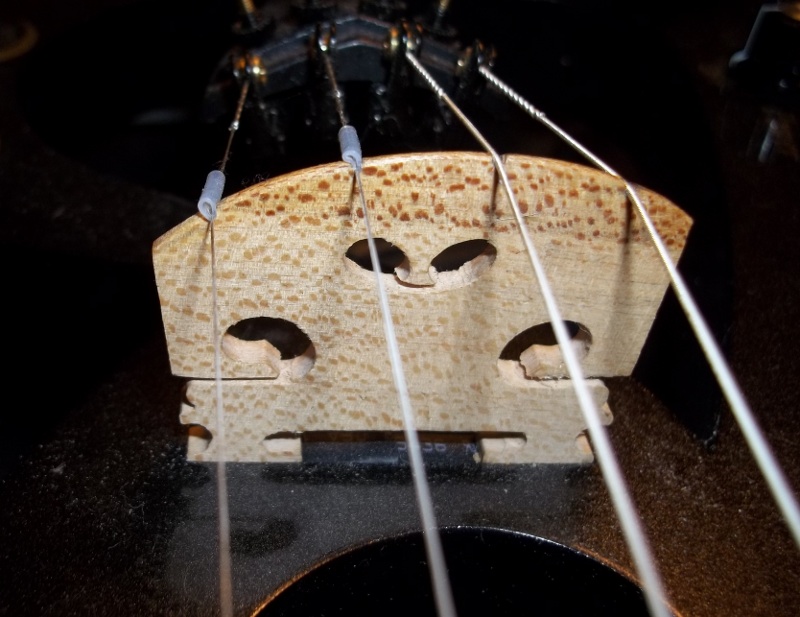 do not get paid enough to be at everyone's beck and call to run what would likely be many analysis for every single instrument on this forum, y'know?
Many kudos to you for the amount of good advice and analysis you already do! It is much appreciated.
![]()
"This young wine may have a lot of tannins now, but in 5 or 10 years it is going to be spectacular, despite the fact that right now it tastes like crude oil. You know this is how it is supposed to taste at this stage of development." ~ Itzhak Perlman
Members
Offline
And my electric has now been de-tubed as well.
This is yet another pic of the first bridge I ever did. LOL
As long as I had the bridge out and half the strings off (to remove the tubes from them) I figured I may as well tune the afterlength as well. I thought maybe it would be easier to do on an electric than an acoustic. Nope. Took a couple of hours of fussing, just like with the acoustic.

"This young wine may have a lot of tannins now, but in 5 or 10 years it is going to be spectacular, despite the fact that right now it tastes like crude oil. You know this is how it is supposed to taste at this stage of development." ~ Itzhak Perlman


