Welcome to our forum. A Message To Our New and Prospective Members . Check out our Forum Rules. Lets keep this forum an enjoyable place to visit.
Currently working on errors from the latest (SimplePress) forum update. Many issues have been resoled and others are being worked on. Thank you for your patience.
 Topic RSS


 (0 votes)
 Regulars
 Offline

Hi all. Here goes. About a year ago
 _, I saw an auction for a Bellafina Musicale 4/4 cello with spruce top and maple sides and back (all plywood) that was a music store return because of a sound post "poke through." For several months, I watched as the price was lowered in an increasingly drastic spiral. And I kept wondering, how difficult could this repair be? I finally purchased it. Upon arrival, I noted that all of the assessories were ebony (except the tailpiece, which looks to be a Wittner type composite with integral fine tuners) and the finish was well done.
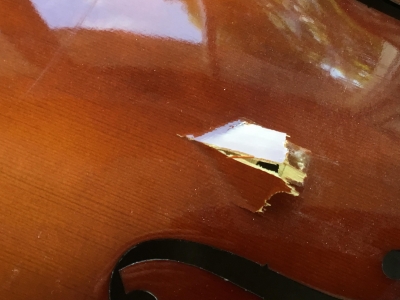
The hole cleanly pierced the inner layer of spruce and the outer layer splintered leaving one end of the wood (for the most part) still attached. In theory, I should be able to fit a glued maple patch through the f hole (kind of like building a boat in a bottle) with a small round spruce plug already attached to fit the missing inner layer of plywood. When this is in place (secure by circular magnets) and while the glue is still wet, I should be able to glue the outer plywood splinters back in place.
A photo of the area in need of repair is attached for examination.
Success is the progressive realisation of a worthy ideal. —Earl Nightingale.
Regulars
 Offline

Hi Fiddlerman (and others). Removing the top will be the Mark II repair if the above does not work. Since it is a student cello made of plywood, I did not think that an accurate graduation was necessary in this instance. I may well be proven wrong.
Success is the progressive realisation of a worthy ideal. —Earl Nightingale.
Regulars
 Offline

The following is a progress photo on the Cello repair. I cut a 1-3/4 inch by 3-3/4 inch piece of 2-ply maple veneer (Sauers & Company Veneers, 3 sheets of 8.5" x 11" that I got from Woodcraft for $16). I cut a radius on the ends to dress them up.
I used a digital 6 inch indicator to measure the thickness of the top plate of the cello at the f holes, and divided the thickness in half to estimate the thickness of the bottom layer of plywood. It would have been easy to cut off a length of cello sound post for the patch, but that would mean that I would have to glue to the end grain. That is not good. So I cut square blocks from a piece of spruce 2" x 4", cut them on a hobby chop saw to the required thickness, and chieseled the pieces to create circles. I glued one in the center of the maple veneer patch.
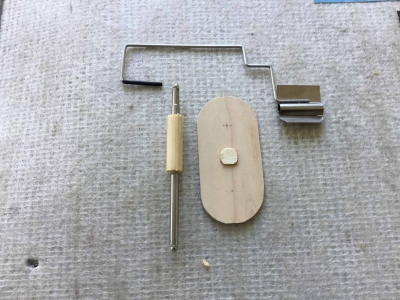
I was going to use magnets to hold the patch in place during the glue up, but I did not think that I could get an effective clamping force by the use of that method. I am going to use 6 segments of cello sound posts for clamps (I am going to use 2 sets of magnets for patch alignment). I have a cello sound post insertion tool (see photo) but the seller did not offer a sound post length gauge for the cello. I made one by cutting down the expanding steel handle for a small shop mirror (cost about $3). I glued 5 mm ball bearings on the ends so I could use a sound post magnetic slope indicator (obtained from the same place I got the sound post insertion tool for about $5). I drilled a segment of a spruce cello sound post and glued it to the sound post length gauge so that it would fit into the sound post insertion tool.
Success is the progressive realisation of a worthy ideal. —Earl Nightingale.
Regulars
 Offline

Hello all. An update on the repair.
Getting the reinforcement plate to the right spot for the repair from within the belly of the cello was rather easy using string, but it was very difficult to properly align. I stuck a piece of painter's tape to the bottom of the reinforcement plate (I attached a piece of string on the end of the tape so I could remove it when the repair was completed). I attached another piece of painter's tape to a disc magnet and used super glue to adhere the magnet tape to the plate tape. Alignment was easy by the use of another magnet on the top surface of the cello.
I made several dry runs using spruce dowels (sound post stock) to attempt to secure the reinforcement plate and found that it was very difficult to get any pressure on the plate due to the curved surfaces of the top and bottom plates. It may have been possible if I used pencil erases on both ends of the dowels, but the glue would have made the surfaces move around even more. I then had a brainstorm.
I purchased some mylar balloons from the dollar store and found that they contain an internal "duck bill" check valve that allows gas to go in but prevents gas from coming out. I cut a piece of 1/4" outside diameter plastic tube with a bias end, inserted the tube through the riser hole in the end peg, fished the tube through the f hole, inserted the bias end of the tube into deflated balloon (secured with tape), and inserted the balloon into the cello through the f hole (a surprisingly easy process).
I glued the top surface of the reinforcement plate, placed it through the f hole guided with a string going up through the sound hole fracture, guided the reinforcement plate into alignment with a magnet, and mouth inflated the balloon through the end of the tube going through the end peg. The upward pressure of the balloon was counteracted by the use of a long piece of wire secured by the use of 2 cello pegs, the cello bridge, and the end peg (a loop).
I checked the pressure at intervals by touching the balloon through the f hole and found no need to add air. After letting the glue set a day, I deflated the balloon by the use of a knife through the f hole. No glue stuck to the mylar and the balloon was easily removed through the f hole. I removed the internal magnet and painter's tape by the use of the previously attached strings. The reinforcement plate is firmly attached to the top plate and is perfectly aligned. I am now working on repairing the top most ply, which is the easier part.
I have to do a similar repair to the bottom of another cello, so it is a good thing that mylar balloons only cost $1 each.
I have a stock of small mylar balloons purchased through eBay (it is either the small letter L or the capital letter I, I can't remember which), but I could not use them in the cello since they had an inflated height less than the cello rib. I thought of securing two of them back to back with double sided tape, but I could only fit one length of tubing through the end peg (other options would be to use a "Y" adapter within the cello or attempt to remove the end peg). I did not do either option because the larger balloon worked so well. It is best to employ simplicity since economy of motion is at a premium once you start working with wet glue.
Success is the progressive realisation of a worthy ideal. —Earl Nightingale.
1 Guest(s)


 Log In
 Register


 Online


