
Welcome to our forum. A Message To Our New and Prospective Members . Check out our Forum Rules. Lets keep this forum an enjoyable place to visit.
Currently working on errors from the latest (SimplePress) forum update. Many issues have been resoled and others are being worked on. Thank you for your patience.
 Log In
 Register


 Topic RSS
 (2 votes)
Member
 Offline


 Purchased cecilio violin and also brass mute here
qid=1346111605&sr=8-5&keywords=violin+mute
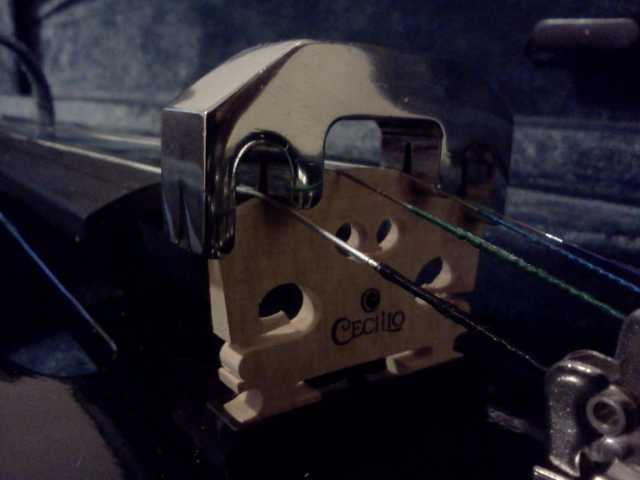
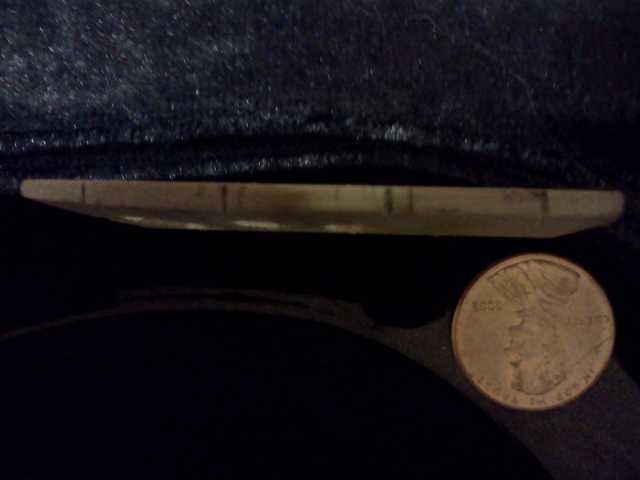
The rubber mute i already had provides nice tight fit, but metal one barely goes on as
visible in the attached image. My question is do I have a bridge that is too wide
or is it the mute that is not made to correct standards?

It appears that the bridge is too thick and need's to be sanded to spec's. I've never used a mute, rubber or otherwise and certainly no authority, but if you look at the slot in the mute where it slide's down over the bridge, it has a ways to go yet. Just looking at the top of the bridge, it look's awfull thick. Should you sand it yourself, sand from the front side keeping the bridge slightly tapered. I've never had to refit a bridge as far as thickness. ![]() It also appear's that the bridge may be a little wide, the mute shouldn't touch the string's when it slides down on the bridge. You may have to relocate the string placement for propper spacing.
It also appear's that the bridge may be a little wide, the mute shouldn't touch the string's when it slides down on the bridge. You may have to relocate the string placement for propper spacing.
I'm sure some of the other member's can help you also.


 Offline


These mutes don't go down all the way but that is a thick bridge. The idea of that steel mute is to dampen the vibrations. You don't need it to slip down all the way. I usually tap it gently so that it grabs the bridge nicely. You can put marks on the bridge but it is not the end of the world..
"The richest person is not the one who has the most,
but the one who needs the least."

Regulars
Offline


from the looks of the pics I dont think that bridge has been cut at all
There is no shame in playing twinkle, youre playing Mozart
The bridge on a Cecilio electric are very thick and need to be thinned out.
Offline
This is true. I guess in many ways you get what you pay for.
"The richest person is not the one who has the most,
but the one who needs the least."
Regulars
Offline
pgb205 said
My question is do I have a bridge that is too wide
or is it the mute that is not made to correct standards?
This might be useful:
Fitting a Bridge to a Professional Quality Instrument
Offline
That is a real in depth pdf on bridges. Thanks for the post. ![]()
"The richest person is not the one who has the most,
but the one who needs the least."
Regulars
Offline
FM: I inherited an old fiddle, which is how I happened to take up fiddle. I had to set the sound post and string it and make a bridge. Above is one of the documents that I worked from. The fiddle in question was decidedly not professional quality, so it may have been a misapplication to make the bridge as thin as I did (4.4 mm at the foot, about 1.4 mm at the top) and to make the feet as thin as I did (1.4 mm). It required a lot of sandpaper and elbow grease. But the fingerboard is low, so getting the right string action implied that the bridge would be short and that the string angle was not going to give a lot of power. So maybe it was a good idea to reduce the thickness.
I also bought an MV400. The bridge was fairly warped when it arrived, so I used the spare, which is also starting to warp. Both of those bridges were thick, but I think they were just prone to warp. I will probably make a new bridge for my MV400, but that fiddle weighs a hundred grams more than my old one, so I won't bother making the new bridge so thin.

Regulars
Offline
I did a nice pdf for making a backup bridge complete with pictures if you're interested in looking at it. It's located here:
"If you practice with your hands you must practice all day. Practice with your mind and you can accomplish the same amount in minutes." Nathan Milstein
Offline
I have no idea if it was a misapplication of any sort but you should be proud to have done it. Not many beginners attempt such things. As a matter of fact, pros don't either. Good for you.
My bridge is fairly thin as well.


The guy who made this bridge is the same one who made my violin. His name is Jan Larsson and lives in Lima, Sweden.
This bridge is over 15 years old and hasn't warped a bit. Super hard maple.
![]()
![]()
![]()
"The richest person is not the one who has the most,
but the one who needs the least."
Regulars
Offline
cdennyb said
I did a nice pdf for making a backup bridge complete with pictures if you're interested in looking at it. It's located here:
Great instructions, and that is a great photo with labels on the parts of the bridge. If it belongs to you, how about contributing it to the Wikipedia article on bridges: http://en.wikipedia.org/wiki/B.....trument%29
Regulars
Offline
Fiddlerman said
I have no idea if it was a misapplication of any sort but you should be proud to have done it. Not many beginners attempt such things. As a matter of fact, pros don't either. Good for you.My bridge is fairly thin as well.
<photos snipped>
The guy who made this bridge is the same one who made my violin. His name is Jan Larsson and lives in Lima, Sweden.
This bridge is over 15 years old and hasn't warped a bit. Super hard maple.
Good photos. Wow, those are some thin feet on your bridge. Under a millimeter, I bet.
Oh, I also had to fit a new endpin when the old one snapped.
Certainly my luthier work hasn't been as good as a pro could do. But I am able to do the basic common things to keep a fiddle up and playable. I like to think the result is 80% of what a pro would deliver (if that kind of thing is even measurable) at 10% of the money cost. Having a pro do it would cost more than the fiddles are worth. I don't even know whether anybody within 50 miles does any violin work, as I am in the biggest city in that radius, and I don't believe there is a high-school orchestra in that radius. I believe that if I were to take a fiddle in to the local music store in my city (25,000 souls) they would send it in to their luthier in their central location (60 to 100 miles away) to have the work done.
Regulars
Offline
FM: is that a bone inlay under the E string?
Offline
Actually yes. How could you see that. I have a piece of parchment paper covering it. Before the parchment paper the bone was so hard that all my E strings would break at that spot eventually. Not that they broke that often but it happened and it was always there.
Dennis, I just realized that you made that PDF. It's great, thanks a lot. You wouldn't be interested in making a "how to fit new pegs" PDF would you?
"The richest person is not the one who has the most,
but the one who needs the least."
Regulars
Offline
Fiddlerman said
Actually yes. How could you see that.
Anybody can see that there is something unusual there. Unusual for us beginners, anyway, maybe not for an advanced player. After that it was a guess as to what it was.
Regulars
Offline
Fiddlerman said
Actually yes. How could you see that. I have a piece of parchment paper covering it. Before the parchment paper the bone was so hard that all my E strings would break at that spot eventually. Not that they broke that often but it happened and it was always there.Dennis, I just realized that you made that PDF. It's great, thanks a lot. You wouldn't be interested in making a "how to fit new pegs" PDF would you?
I can certainly do that Pierre. But in the cold harsh reality of it... I seriously doubt if anyone on here that doesn't have an interest in accumulating luthier tools would justify the one time use of a peg shaper ($73.50) and a hole reamer ($53.98 semi-fluted to be proper).
I have them because I worked PT at the shop and on ocassion will do some for others during a setup or repair to an instrument.![]()
"If you practice with your hands you must practice all day. Practice with your mind and you can accomplish the same amount in minutes." Nathan Milstein
Regulars
Offline
cdennyb said
Dennis, I just realized that you made that PDF. It's great, thanks a lot. You wouldn't be interested in making a "how to fit new pegs" PDF would you?
I can certainly do that Pierre. But in the cold harsh reality of it... I seriously doubt if anyone on here that doesn't have an interest in accumulating luthier tools would justify the one time use of a peg shaper ($73.50) and a hole reamer ($53.98 semi-fluted to be proper).
I have them because I worked PT at the shop and on ocassion will do some for others during a setup or repair to an instrument.
That is actually a job needed by one of my fiddles. You're right that the cost of the tools has been holding me back. But also I don't think I could find good instructions last time I looked into it.
Somebody could do-it-themselves and sell the tools when they are done. Here is a reamer for $36 delivered. http://www.ebay.com/itm/VIOLIN.....0d05f3 And here is a peg shaper together with a reamer for $78 delivered. http://www.ebay.com/itm/Luthie.....689e1dd0 Please say whether you think these look adequate.
What about writing a quick overview of fitting pegs, say a half or a quarter of a page, even without photos? Then if you find interest in it, you could fill in the details later.
BTW, I've sometimes wondered whether anybody sells preshaped pegs. Seems like you could just specify them by the diameter of the end---they would all have the same length and taper. Then somebody would just need a reamer to fit their own pegs. The reamer could be used as a gauge for each hole, to know what end-diameter peg to order. There would be say ten or twenty different end-diameters, and a factory could turn out each size, perfectly shaped, by the hundreds.
Regulars
Offline
The biggest issue with new pegs in a violin is the fact that the taper needs to be spot on. If you cut too much out of the hole or off the peg it's runined forever... well...until you either buy new pegs or fill the hole in and redrill and ream it to the proper size.
The reamer you posted the link to is the "right kind". it has a smooth section and then cutters on the opposite side, this prevents the taper from wandering off center.
Stewart McDonald has ebony pegs that have been reported to have the correct taper and require no further trimming, so they would be as you describe.
http://www.stewmac.com/shop/Tu.....g_Peg.html
I suppose I could do a small pdf and even include pics as well for those fool hardy enough to continue with the job, but homewood has a beautiful article complete with pictures that I think you will find perfect.
http://hmi.homewood.net/pegjob/
You usually cut the peg taper first, just cleaning it up a bit and then trial fit it to the hole. At first it won't go in completely if all is correct. (Peg tapers are usually adjustable, reamers are not.) Then take the reamer and start cutting the hole, just a tiny bit of a cleanup pass. Then fit the peg back in. I use some old school carbon paper strip wrapped around the peg and then press and turn it in the hole. You can then use a light and see the high and low spots. Hit the hole with the reamer a tiny bit more and then do the carbon paper trick again. Then flip the paper over after the hole looks good and check the peg. If it's all smooth and proper it'll have a nice carbon paper color to it. I set up the peg taper cutter with an old peg and a scrap of wood first. It took a few trys to get it adjusted correctly.
Trial fit it to the hole and see if it sticks out the opposite side about a 1/16" to 1/8". Do this procedure to all the pegs and holes and go SLOW. Once everything is proper the pegs will ALL stick thru the peg box the same amount. If they are cut properly, they will stay tight and look beautiful. I twist the dickens out of them as I push them in without strings for about a dozen turns. It tends to burnish the hole I.D. and allows the peg to bite in and hold tight. I spent about 45 minutes doing my first peg job. Now it takes me about 20 minutes. You eventually get a feel for how much the reamer is cutting into the peg box wood and smoothing the pegs as well. The first time... take all the time in the world!
Put on the strings and tighten properly and press inward gently as you tune the strings. Seldom will 'drops' be needed if the taper is proper and mates with the peg with as much surface contact as possible.
That's the short and sweet of it.
"If you practice with your hands you must practice all day. Practice with your mind and you can accomplish the same amount in minutes." Nathan Milstein
Great job Dennis.
I want to add about bushing the peg holes. Far too often there will be cracks at the peg holes or they are just too worn. To remedy this you use a maple dowel and shave it too a very fat peg. Ream the peg holes and glue these over-sized pegs into the peg holes. When dry trim them flat with the sides of the peg box. Then from each side drill a pilot hole through the bushing. Now from the side the peg goes into drill through both bushing pieces and now ream out to fit a new peg.
1 Guest(s)


