Welcome to our forum. A Message To Our New and Prospective Members . Check out our Forum Rules. Lets keep this forum an enjoyable place to visit.
Currently working on errors from the latest (SimplePress) forum update. Many issues have been resoled and others are being worked on. Thank you for your patience.
 Topic RSS


 (0 votes)
 Regulars


Amateur enthusiasm
I have an antique violin in poor condition, and I also have a need for discreet practice (I'm shy about my beginner's intonation). So, I need a way of having a quiet fiddle until my technique develops.
As an engineering technician, I make things (new things) for a living, and so the idea of making my own seemed compelling. I had the antique to use as a physical model, and the Internet for everything else. I also had some basic materials around me, and the tools to form and shape the idea into a reality.
Some four weeks later, I have almost finished the solid fiddle; it's been playable for the past fortnight, and the electronics are all that are needed to be completed. Beyond that, I need to learn to play, but that's quite another story.
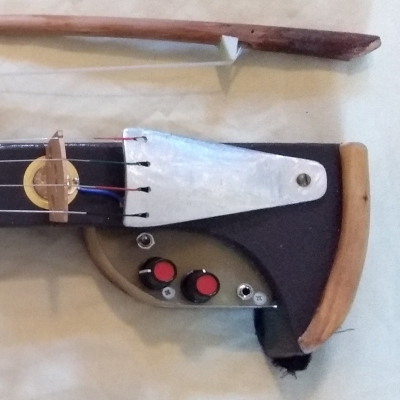
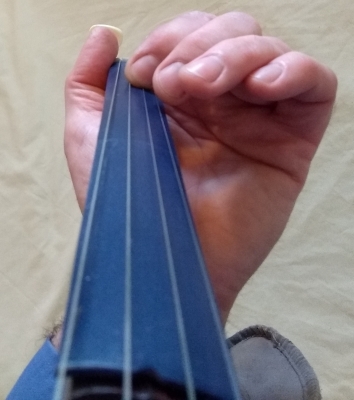
I attach a couple of photos of the project, and I'm prepared to answer any questions which others may have. When I feel confident enough, I may upload sound samples to demonstrate the timbre. The photos also include an image of a home-made bow, which cost virtually nothing to make and plays better than it ought. There are details to polish; the nut is an obvious work-in-progress.




Peter
"It is vain to do with more that which can be done with less" - William of Ockham
"A crown is merely a hat that lets the rain in" - Frederick the Great
Regulars


@Peter, That's quite a nice project you have there. You obviously have a love of making things and the ability to do so. I've seen some home made instruments on ebay that were scary.
This looks to be a very functional instrument. Looks well done! The really nice thing about this is when you begin to play you can plug it into something with only headphones and not bother anyone during the learning phase.......or you could plug it into a 10,000 watt PA system and let the whole southern end of the UK hear it!
Regulars
 Offline

@Peter. As a maker myself, your creation was of interest. A bridge acts in a rocking motion, so the pickup should be arranged to make contact on the bridge ends for best performance. The string between the bridge and the tailpiece should be about 1/6th the distance of that between the nut and the bridge. I have not measured it, but your’s appears to be short. Securing the tailpiece to the body likely will dampen the system.
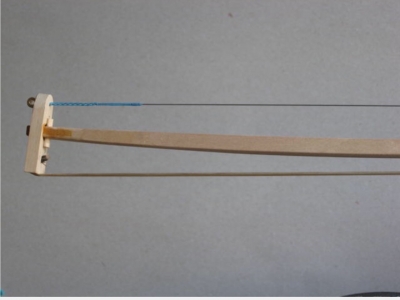
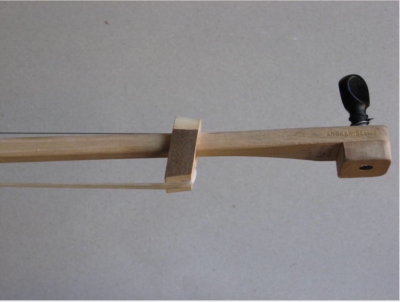
Per the bow, I have provided some photos from my archive that may be of use to you.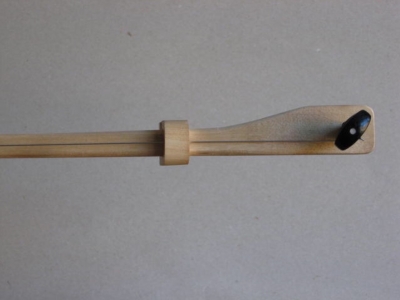



Success is the progressive realisation of a worthy ideal. —Earl Nightingale.
Regulars


Hi @starise,
Thanks for the feedback (I haven't tried hooking it up to a full-fat amplifier yet). It's not completely quiet, but is perhaps 10dB down on the antique violin.
Hi @Irv,
Yes, the 1:6 ratio has been horribly violated! It's because this started as a proof-of-concept rough, and progressed quickly to a usable object; the only strings I had to hand were the (reasonably fresh) ones from the acoustic violin, and I was faced with pre-trimmed lengths. To guarantee the machines didn't slip, I mounted the tailpiece as you see it. If / when I restring it, I'll truncate the tailpiece and hang it from a peg in the accepted fashion, and put the thing where it belongs.
Your bow is a work of art. Mine was disciplined (heavily) by Occam's Razor; I wanted to see how simple it could be and still function adequately. The stick is a length of cherry-plum twig from last year's trimming, cleaned of bark, cambium and surface knots but otherwise still in the round. The fulcrum (frog) is a triangular prism from the same lump of FR4 from which I cut the fiddle's nut. At the far end, a 10 mm section of the same stick is epoxied transversely to lift the hair off the stick. The 'hair' is 25 feet of 300 um fishing line Nylon monofilament which is wound as six complete turns around two 2.0 mm c-pins pressed through the stick. It took a while to rosin up, even after scarifying the Nylon with 800 grade paper.
Can you guess what the fingerboard is made from?
The bridge is a bit odd, for sure. I only had one piezo transducer, and so instead of mounting one under each foot, I cut the feet off and popped it under the middle. It works, but I have little control over the tone (just a guitar-style capacitor / 500 k pot treble cut). My intention was to use one under each foot, and have two independent volume controls feeding their own jFET buffers into the main headphone amplifier. The amplifier is a dual opamp: one section is a 30 dB gain block, the other is a NIB driver which gives good service in ordinary 32 ohm headphones. Yes, I like bending rules.
My restless me wants to make another one; but taking time and trouble over it. We have a holly tree in the rear garden which needs trimming. That's got promise as a serious tonewood, I just need to be patient while it slowly dries in the garage.
Full-disclosure (back-story)
I've spent the last 45 years as a radio amateur and occasional guitarist; I've taken radio as far as I can, and now I'm into a whole different challenge. I've taken a vow of radio silence, and I won't be fretting over it.
Peter
"It is vain to do with more that which can be done with less" - William of Ockham
"A crown is merely a hat that lets the rain in" - Frederick the Great
Regulars
 Offline

@Peter and others. The inexpensive solid body violins I experiment with have a thin piezoelectric element that straddles both feet of the violin bridge. Only half of it is active. The Chinese randomly place the active portion, but it works best if placed under the bass foot. So placing your pick up under the bass foot should work fine.
Send me a pm with your address and I would be happy to send you some roasted violin bridges and a bow’s worth of black horse hair.
Success is the progressive realisation of a worthy ideal. —Earl Nightingale.
Regulars
 Offline

@Peter and others. I do not know if you have access to a lathe, but if so the following photo shows a simple jig to create violin fingerboards. No clue as to the wood species you used on yours, but grade c ebony fingerboards from India are perfectly satisfactory and are quite inexpensive. I have used roasted maple for cello finger boards and they also work well.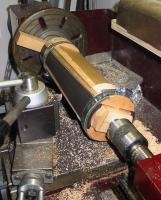
Success is the progressive realisation of a worthy ideal. —Earl Nightingale.
Regulars


Hi @Irv,
Thanks for the tips on piezo wafer placement; I'd have experimented to find the best location, but for now the huge 1" wafer I have under my footless bridge covers the middle 60% of the bridge's bottom width. I'd still like to use two, one under each foot and with its own level control, when I make the next iteration of the solid fiddle. It's good to know that if I have a choice of where to put a single, small piezoelectric device, then the bass foot is the location of choice.
I'm in UK, and the shipping might be awkwardly expensive; your offer of bridges and hair is very generous but I will decline unless I can contribute to the shipping at least. It may pay me to learn the carving of bridges myself, and to chat-up the local horse & pony community! I'm assuming you are in North America somewhere; if not, forgive the presumption.
The fingerboard material is bamboo composite; it has material properties not wholly dissimilar to ebony in that it is hard, stiff and fragile. It was once a compostable coffee cup (search "ecoffee cup"), a shape which offers a ready curved surface, albeit half the required length, and instead of a cylinder it was (and remains) a conic frustrum. I slit it lengthwise, cut away the base and epoxied onto the neck of the main sustain beam (yellow pine, old, and low in resin content). There is a steep scarf joint halfway along the fingerboard, with the upper edge of the joint running away from the player. There were discontinuities at the edges of the joint on the player-side, and these were back-filled with epoxy (unnoticeable once the whole board has been sanded over). The playing surface is matt in appearance, and silky in feel. I don't feel any difference between the cylindrical fingerboard of the antique violin and the conic board of the solid; the antique is out-of-service having been prepped for a table refurb, but I expect to feel a difference once I start playing that again, since my 'touch' should have developed a little more then.
I'm intrigued about the process of roasting maple components. Is the wood roasted before or after machining? What temperature and dwell time are used? Ordinary air, or a special kiln gas? What does it do to the material properties; hardness, modulus, colour? I can imagine the smell, gorgeous!
Peter
"It is vain to do with more that which can be done with less" - William of Ockham
"A crown is merely a hat that lets the rain in" - Frederick the Great
Regulars
 Offline

@Peter and others. I like to use bamboo flooring material for various projects. I plan to copy a Cocker split bamboo violin bow this fall. Except he used six sides and I want to use eight (to save a scarf joint).
There is a whole discussion thread on roasting at this forum. Should be easy to find since I made a recent update. The search function is rather useless, I am afraid. In a nut shell.
Dry wood in oven at 240 f to remove moisture. Something as thin as a bridge would take about two hours.
Rmove wood from oven, wrap in a single layer of newsprint (it has more surface area, so preferentially removes available oxygen through oxidation), seal in aluminum foil. Return to oven (convection if possible). Heat to a minimum of 380 f for about 4 hours.
The process decomposes sugars and chemically alters bonds in cellulose. It definitely changes the acoustic character of wood. So far I have done maple, cherry, and spruce. Oak is next. Color is darker in appearance and effect is throughout the material.
Ovens thermostats are notoriously inaccurate so you may have to play with the setting. Wood treated a few degrees below 380 f will show no roasting effect.
I have shipped stuff to the U.K. before, so do not let that worry you.
By the way, I suggest that you receive a diy metal from the forum. But I have not been too successful with these suggestions.
Success is the progressive realisation of a worthy ideal. —Earl Nightingale.
Regulars
 Offline

@Mouse . The US Navy did most of the experimental work on this during the Second World War when teak was unavailable for war ship decks. Unfortunately, little material is available on the internet (which I suspect is due to guitar manufacturers after they began to roast to mimic the acoustics of old guitars). I have adapted the process so anyone can do this at home. My method is based on physics, chemistry, and seat of pants experimentation.
The process began with the Vikings since they found that roasted wood ship hulls did not succumb to sea worms.
A retired aerospace engineer roasts all of the violin components and he wins a lot of awards with his creations. He utilizes a vacuum oven. Since he loses heat transmission via convection in such an oven, all of the wood needs to somehow be in contact with the heating surfaces (conduction) or be in sight of them (radiation). Commercial ovens utilize an inert gas (nitrogen or argon). Aluminum foil works well for me.
Success is the progressive realisation of a worthy ideal. —Earl Nightingale.
Regulars


Hi @Irv,
The coffee cup was already ruined by a crack down the side; it was a moment away from being hammered to fragments and composted. I needed a fingerboard-profiled object, and I needed it quick. I was seriously looking at the eaves-trough (gutter in UK) on the rear extension of the house; this was smooth, hard and has the required radius. However, I looked around and remembered the cup; I was impatient to make a stand-in fiddle to get me playing fast, and I do like a challenge. The fiddle was made in a foolishly short time, and many compromises and short-cuts were made. Lots of mistakes, too; I've learned a lot in the past month. For what it's worth, I cut the nut to match the conic profile of the solid fiddle's fingerboard, the board is mechanically 'correct' for the application; it accurately follows the strings from the nut down to the bridge. I may have trouble adjusting to the true, cylindrical profile of the antique violin's ebony board. Buying a lump of ebony would have delayed me, and then I'd have to shape it as one would. The coffee cup only needed sawing up and gluing on; once the five-minute epoxy had cured, I finished the edges with a slitting disc in my hand-grinder. I then swapped-out the slitter for an 80-grade sanding disc and roughed-out the neck shape. It all happened very quickly; exhilarating even.
By the way, the tailpiece isn't rigidly mounted, but swings on that single screw. I have a general understanding of acoustics, and appreciate that the power from the strings is transmitted down the bridge into the table in a regular sound-box violin: the bass foot is responsible for applying the lower two strings' power to the bass bar, and the sound-post under the treble foot puts the whole region around both table and back into motion. There are many analogous mechanisms in the tuned circuits, feeders and antennas in a radio system. The solid fiddle puts the entire spectrum from all four strings into a piezo wafer under the bridge (the feet are removed), and all the power is reflected by the pine sustain beam underneath. I know I'm being shamelessly iconoclastic here, but it's my comfort zone. I feel this is how technologies move forward. I'd love to know what my engineers confide in each other about me, when I'm out of earshot.
Peter
"It is vain to do with more that which can be done with less" - William of Ockham
"A crown is merely a hat that lets the rain in" - Frederick the Great
Regulars


Just in case anyone's wondering,
When I rebuild the antique violin it will not receive the same treatment as the solid fiddle; no hand-grinder, no epoxy resin, and no items from my junk-box.
I have first to make a set of soft-faced clamps, procure or build a heated glue-pot, and find some pukka spruce cleat material. I'll record the work in photos and if appropriate I'll write it up, complete with Oxford commas.
Peter
"It is vain to do with more that which can be done with less" - William of Ockham
"A crown is merely a hat that lets the rain in" - Frederick the Great
Regulars


@Mouse
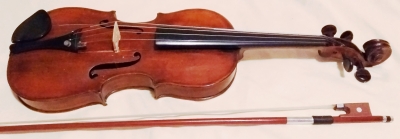
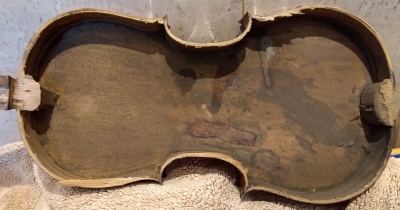
Here's the one photo I can find of the complete instrument, before taking the table off:
As you can see, there are two nasty cracks. In spite of the damage, it played sweetly and I'm becoming impatient about repairing it. Here's what it looks like indoors:
Not a pretty sight. It no longer looks like a handcrafted, 18th century violin; it has no corner-blocks and it's generally very rough. I'm convinced it's a modern fake, but then the concept of identity is pretty subjective: it's my violin, I love the way it sounds and I'm planning to care for it.
Peter
"It is vain to do with more that which can be done with less" - William of Ockham
"A crown is merely a hat that lets the rain in" - Frederick the Great
Regulars


An update on the Solid fiddle.
I needed something to take the place of the upper bout of an acoustic violin; something against which to feel for the third position. I have added another piece of bed-frame to do just that:
I've also made a cavity in the lower end of the main beam into which I intend to move the electronics, cleaning up the awkward lump on the far side.
I'm hoping the new prosthesis will make it more playable for practice. I don't play it at home anymore (I use the Dutch antique exclusively now), but as I arrive 90 minutes early for work each day, there's an opportunity to practice quietly in my lab before all the interruptions arrive.
I guess I could call this thing the "Singing Bedstead", as a nod to the Rolls Royce Flying Bedstead used in the 1950s to test the precursors to the engine used in the Hawker Siddeley Harrier.
Peter
"It is vain to do with more that which can be done with less" - William of Ockham
"A crown is merely a hat that lets the rain in" - Frederick the Great
Regulars


Update on the Solid Fiddle:
I have taken this device as far as I wish to, and thought I'd close-out the thread with a final report.
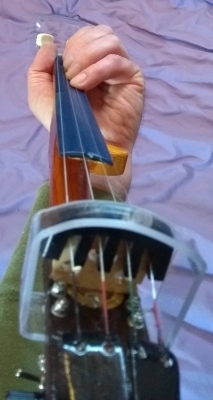
I have trimmed the main beam and hollowed it out to accept the electronics, instead of packaging the amplifier and controls in a pod on the outside. The result is neater.
The other main finishing touch is to make a pair of guards for the pegs and the bridge, to make the fiddle more robust in transit. I take it to work each day in my day-bag for early morning practice, so it makes sense to give these two delicate areas some protection. The guards are made of 3 mm thick polycarbonate sheet.
I also made a terry towelling chin protector, to separate the shellac finish from my beard.
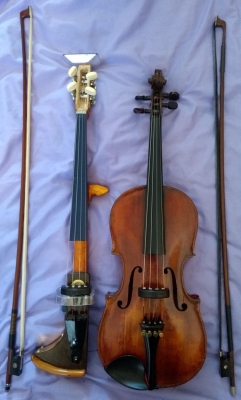
Some effort went into making the solid fiddle feel like the antique violin I play, and the weights do differ: the old violin weighs 470 grams, and the solid is 550 grams. The playing dimensions are fairly closely matched and I have little difficulty adjusting between the two instruments. I routinely practice with both fiddles, changing from one to the other as I feel fit. I tend to use the solid where the practice its 'experimental' or I am performing a particularly ostinato exercise, switching to the antique when I want to hear the nuances of the piece. I enjoy both.
I present a few photos for your interest, starting with a picture of the solid fiddle with its older brother:
I welcome inquiries and comments.
Peter
"It is vain to do with more that which can be done with less" - William of Ockham
"A crown is merely a hat that lets the rain in" - Frederick the Great
Regulars
 Offline

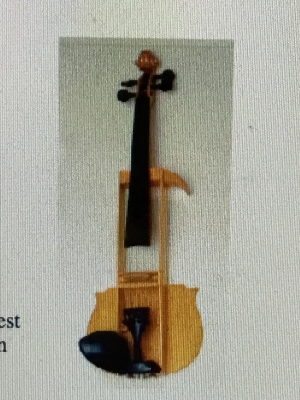
@peter and others. I am currently working on the building of some 1/2 sized practice cellos. Next up is a 3/4 sized practice string bass (likely unique). After that, Imam going to attempt a 4/4 sized practice violin approximating the below pictures. The bow will be a sawed in half carbon fibre with an internal spline for rigor during use. 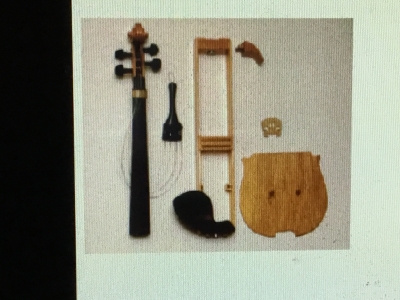


Success is the progressive realisation of a worthy ideal. —Earl Nightingale.
1 Guest(s)


 Log In
 Register


