FIDDLERMAN VIOLIN TUNER
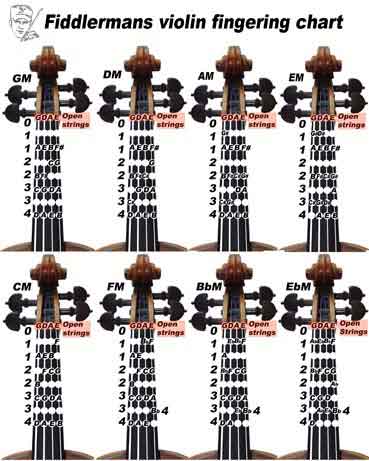
Violin fingerboard chart link
This chart allows you to learn where to place your fingers on the violin or fiddle fingerboard for eight different key signatures in the first position. Don’t rely solely on location for finger placement. Use your ears and listen very carefully to each note.
Click on the image to inlarge, download, and print.
Place the violin fingerboard chart in a practice room or in a location in which you can study it on a regular basis to learn 8 different key signatures on the violin and fiddle.
What size violin do I need?
Most adults play on full size violins otherwise known as the 4/4 size. If you are unsure of what size you need or are buying for your children, click here: violin sizes
For the best (Fiddlerman Approved) starter violins, click here: beginner violins

Here are the violins open strings in order. The first string is called E, is the highest open string on the violin and is labeled with the roman numeral I. The next string is the A = II, then D = III and the lowest is the G = IV.
Download Fiddlermans FINGERING CHART or THIS ONE and put it in your practice room. You can also put it by your bed to stare at before going to sleep or in the bathroom.

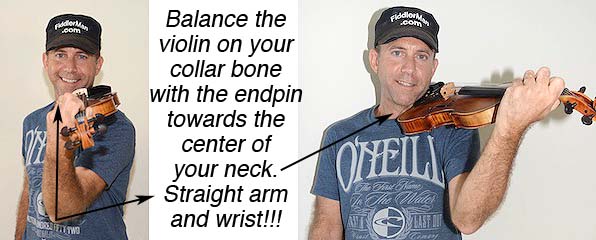
Hold the violin – Begin with your legs comfortably spread at about shoulder width apart. Start by placing the violin on your left shoulder/collar bone, lifting your chin slightly and placing the end pin of the violin towards the center of your neck. Lower your jaw/chin so that it rests comfortably on the chin-rest. Find a good comfort zone. If it is not comfortable you may eventually need to find a more suitable chinrest. Do not over squeeze the violin to hold it, rather gently rest your head on the chinrest.
The violin should point slightly to the left. Not straight in front of you and not way off to the side. Keep the instrument high enough that you will be able to reach the tip of the bow and that it will remain balanced.
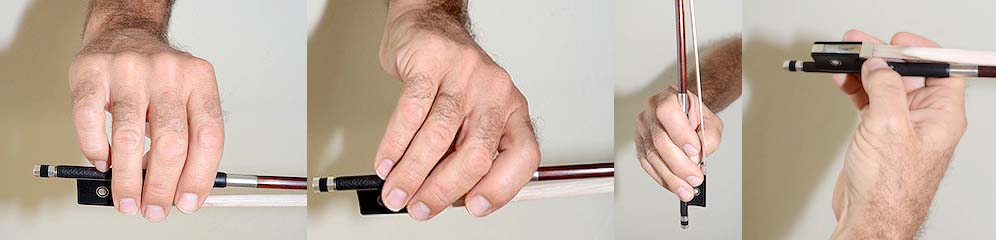
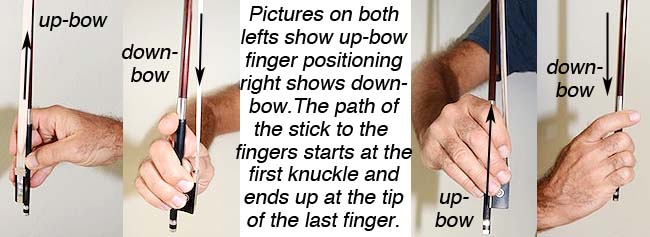
Hold the bow – Place your thumb in the C of the bow frog and place the other fingers on the other side of the stick with the pointer finger towards the tip of the bow. Keep the all the fingers comfortably together and relaxed. With the pinky curved and the tip on top of the stick, turn your hand counter-clockwise so that the fingers lay at an angle.The bow’s stick makes contact on the first fingers knuckle with each following fingers closer to their tips. Finally the pinky needs to learn to sit on top of the stick and stay there. A proper hold will enable you to make flexible smooth bow changes.
After learning to correctly hold the violin and bow begin by drawing the bow over the strings while concentrating on keeping a straight bow stroke at a selected contact point between the bridge and fingerboard. Draw long, slow, full bows and don’t be discouraged too soon about the sound. Use mostly elbow and very little shoulder movement. In the beginning use a mirror to learn the feeling of drawing straight bows. Don’t expect perfection right away. Even pros draw crooked bows. If the bow travels up and down the string towards and away from the fingerboard experiment with slight angles to find the right angle for drawing a straight bow.
Find here some of the many free etudes, scales and studies and solos that I have compiled mostlly for beginners up to intermediate.
Begin with the “FIDDLERMANS BEGINNERS ETUDES-STUDIES”
For a PDF with explanations of staffs, measures, time signatures, and repeat signs for reading music click here.
DRONES
Use these drones in all keys to practice and perfect your intonation while playing scales arpeggios and as well as other exercises and pieces played in the corresponding keys. Begin by tuning your instrument using the A major or other corresponding drone.
The drones will loop automatically.
C DRONE
C#/Db DRONE
D DRONE
Eb DRONE
E DRONE
F DRONE
F#/Gb DRONE
G DRONE
G#/Ab DRONE
A DRONE
A#/Bb DRONE
B DRONE
TRALA VIOLIN APP
A great tool for learning to play the violin on you own it Trala. Download the app on your phone and get started in seconds. The app will take you through all the steps to get up and running, and help you progress as a violin player. Learn more about Trala and download their app for iOS here.